FREE Standard Shipping on Orders $69+ with code:
FREESHIPPING


Cheers
Be the first to cheer this project!
Give a Cheer
Be the first to cheer this project!

 Give a Cheer
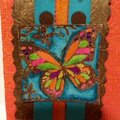
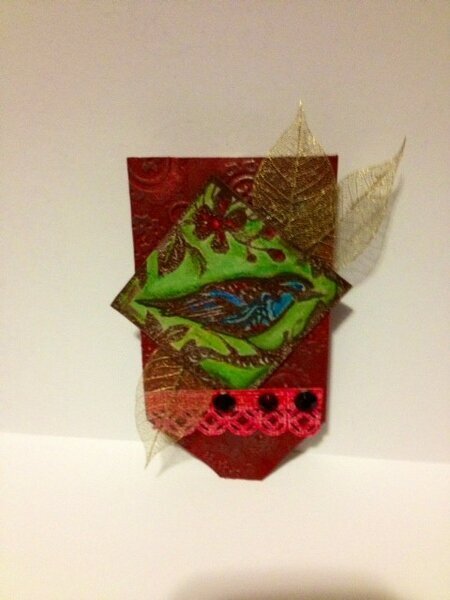
Here are my 2 medals that I sent to Daniel. I had so much fun making one medal that I decided to make another. Sorry this description is so long!For the bird medal. I started with a piece of red cardstock(cooredinations) and embossed with cuttlebug EF(perfectly paisley). I applied some perfect medium to the raised areas and added some perfect pearls in pearlescent blue to the cardstock. Next I added a small strip of pink cs(coordenations) that I used a border punch on. It wasn't the right color of pink that I wanted so I used some red and magenta crayolas to alter the color a bit. For the focal image, I heat embossed my bird image(Studio 112)with some bronze EP onto grunge paper.I colored the images with crayola crayons and some crayola markers. I adhered the image with some scor-tape and added some red bling and the gold leaves(not sure where either are from). I attached a small clothespin to the back of it so he could either wear it or pin it to something for decoration.For the butterfly medal. For whatever reason the closeup shot uploaded first and I couldnt edit it. I started with a piece of orange cs(cooredinations) and embossed that with an EF by Sizzix(kaleidescope). I colored over the raised areas with a pink crayon. Next I used an EF(paper studio) on some heated craftfoam. I let it sit for a few hours to get an impression. Once done, I painted it with some bronze DecoArt paint.I attached a teal ribbon(Hobby Lobby) to the base and added a smaller orange ribbon to that. Next I added my image. I heat embossed my image(Studio 112) onto grunge paper and cut out. I colored the butterfly images with some Tulip Fabric paint, once dry I colored over the entire images with crayons to add depth and shadows. I adhered the image using some quick dry adhesive and added a small pink border strip that I also colored with crayons. Finally, I attached 4 magnets to the back of the cardstock. These were really fun to make, thanks for looking!
No products have been added to this project.

Thanks for spreading positivity!