Thank YOU! It's Customer Appreciation Week!
EXTRA 11% OFF Orders $100+ With Code: THANKYOU
EXTRA 11% OFF Orders $100+ With Code: THANKYOU


Be the first to cheer this project!

 Give a Cheer
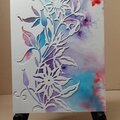
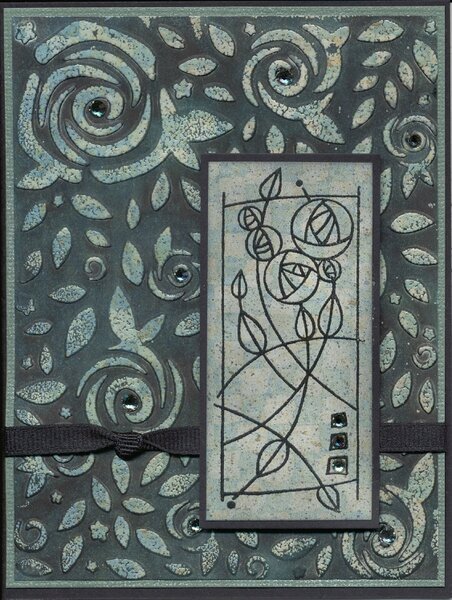
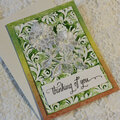
This is for Stampwilly's Summer Coat Challenge on Two Peas in a Bucket. Essentially, it's using Joseph's Coat Technique on patterned paper. You can see a tutorial and sample card here: http://stampwillydesigns.blogspot.com/2013/06/technique-tuesday-josephs-coat-with.html
April, thank you for reminding me of this cool technique.
The colors didn't show up in my photograph; I think I must have placed the light wrong. I got lucky when I scanned the card; I placed that one first. You can see colors in the scan, and you can see the bling in the photo. Someday, I'll figure out how to do both in the photograph.
CARD:
4 1/4 x 5 1/2
Judikins black cardstock
DCWV Metallic Stack, green (I don't care for this cardstock much so I used a piece to experiment with glitter spray a long time ago. I liked it even less, but I didn't throw it away. It worked very well with this card; the color matches the design that in the patterned paper.
Ribbons and Bows Oh My!Grosgrain Ribbon
Swarovski flat-back rhinestones, Black Diamond, SS12 and SS16
FOCAL IMAGE:
Basic Grey patterned paper (Sadie, thank you for identifying it for me.)
Unknown stamp (an eBay find)
Versafine Onyx Black ink
Ranger's Superfine Clear Embossing Powder
Distress Ink, Black Soot (sponged over image and pp)
ETA: I've kept thinking that something was missing from my card and even held up various items, but I couldn't find anything that worked. Then I was reminded that for this challenge I needed a stamped image. At first, I was just going to leave it alone, but then I was reminded by another person. With all that encouragement, I went looking for a stamp I knew I had that would work with the background. I stamped it on the same patterned paper and heat embossed it. Then I sponged Black Soot Distress Ink over the entire surface. I used attached it with mounting tape to pop it up a bit and added more rhinestones. I like it much better this way. It finally seems finished now. Thank you April and Cindi.
BACKGROUND:
Basic Grey patterned paper
Ultimate Crafts Embossing FolderCottage Roses
Versamark Ink (applied with a brayer)
Ranger's Clear Embossing Powder
Distress InksPine Needle and Black Soot (applied with a sponge)
I followed April's tutorial
I embossed the patterned paper with the embossing folder.
While still in the folder, I brayered on the Versamark. Keeping it in the folder helps to support the raised pattern while brayering.
I heat embossed with clear embossing powder.
First I applied Pine Needles Distress Ink, and that was pretty; but it didn't give me the Jenny's Coat contrast I was looking for so I sponged on the Black Soot. (I first saw this technique in a Technique Junkies Newsletter, and they called it Jenny's Coat instead of Joseph's Coat. I thought that was a good name for it.)
I assembled the card, adding the ribbon and gems.
TFL.
Daria
No products have been added to this project.

Thanks for spreading positivity!