
Materials Needed
Containers (towers or holders) for your cardstock and paper supply, a label maker (to label all containers), a large work surface for sorting if you don’t have one in your space
The Challenge
To go through ALL of your paper and cardstock, purge what you won’t use, organize it into a system, and find the best place in your studio for its permanent home.
Vertical vs Stacked Organizers
Here we’ll problem-solve one of the supplies we love and couldn’t scrapbook without; cardstock and scrapbook paper. This scrapbooking staple can be tricky to organize because of space requirements, and it also comes in hundreds, if not thousands, of designs and colors. Thankfully, it’s easy to organize, and even fun, when you have a plan.
You have two choices when it comes to storing cardstock and paper:
- Vertical: Paper is vertical in paper holders
- Horizontal: Paper is stored in stacked paper trays (the paper trays from We R Memory Keepers work quite well)
Once you decide on your storage system you’ll be able to determine container options.
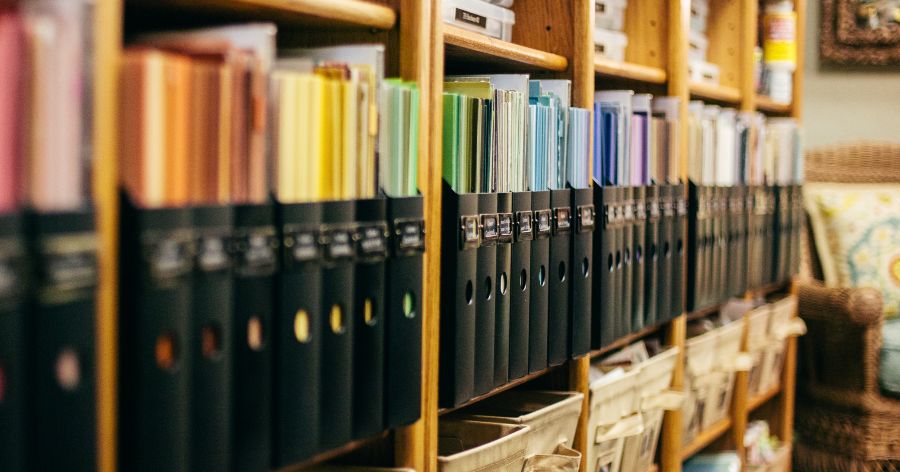
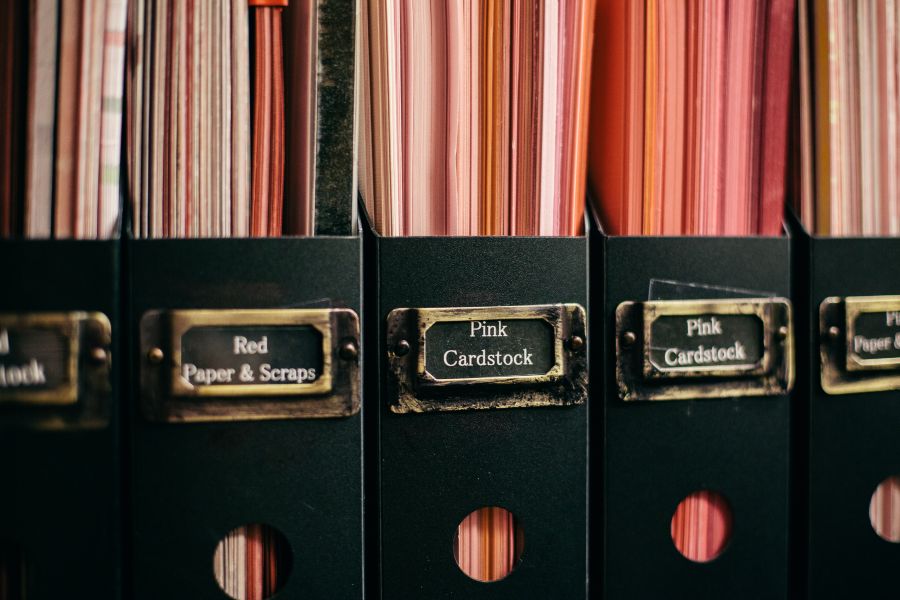
Both Stacy and I have tried storing paper vertically and horizontally. We both settled on vertical storage on open shelves (me) and in a cabinet (Stacy). We both use Storage Studios Paper Holders to hold all papers in our organizational systems. Paper is easily accessible on our shelves, is easy to flip through to see what we have, and there isn’t a dust accumulation issue. The only downside is that the containers take up horizontal shelf space, where as papers stored in a vertical tower only take up a small amount of floor space and the wall space above. If you’re tight on space, verical storage may not be your best option.
For horizontal scrapbook paper storage, consider a tower, like these wonderful stackable scrapbook paper trays. They only require a 12 x 12 block of floor space for each stacked unit. You can make stacks 30 trays high. The problems we encountered with Paper Trays is the dust accumulation on the top sheet of paper in each tray, remembering what papers were at the bottom of each stack, and the struggle to get the papers on the bottom of stacks out of the trays. Interestingly, the trays can be turned on their side for horizontal paper storage but I find they come apart when loaded unless taped together with clear postal tape.
Tip: To handle the dust issue, place the top piece of paper in each tray into a 12 x 12 page protector, or place an empty page protector directly on top of the stack (trim the hole-punched edge off so the protector fits perfectly inside the tray). To help with the problem of getting the papers out of the trays, place a Storage Studios Divider on the bottom of each tray before you add the paper. They are the perfect paper mover. The tab on the divider serves as a handle to raise the stack of paper so it can be pulled forward and out of the tray - enabling you to search for the papers you need.
Of course, there are other options available for vertical and horizontal organizers. Look at the lists below to see if you can find something that will work for your needs. If there’s something around the house you can modify or repurpose, use it.
Vertical Paper Storage Options
(cardstock and paper that stand up and store horizontally)
- Hanging file folders in rolling carts or file cabinets
- Storage Studios Paper Holders
- 12 x 12 wire cube systems
- Desktop files
- Wood shelves and cube systems like the IKEA Expedit - store paper right on the shelf or in Storage Studios Paper Holders.
- Metal, fabric or woven baskets - stack paper upright. Expandable portable paper files, these are good for transporting paper to crops
- Zip-top bags - insert paper and hang from skirt hangers
Horizontal Paper Storage Options
(cardstock and paper that lay flat and store vertically)
- Paper Trays
- Iris lidded boxes in hanging closet organizers
- 12 x 12 wire cube systems (you can easily make this by taking the wire cube units from Target or the like and attaching the “extra” sides to the interior using zip ties, which creates additional shelves.)
- Multi-bin literature sorters
- Wood shelves and cube systems like the IKEA Expedit
- Plastic storage drawers
- Mini stackables cabinet units
- Pizza boxes - easy to decorate and stack, just make sure they’re not “used”!
Now that you have ideas for what to store your paper in, let’s talk about how to organize your paper
Paper Organization Category Options
- Brand: This is a good idea if you scrap entire lines (i.e., collection kits), or know what your favorite manufacturers produce. If you don’t know the Pink Paislee brand from Crate Paper, then move to the next step. This system works best for the scrapbooker who picks out a photo and says,“This would look good with some BasicGrey papers.”
- Color: If you match or coordinate paper colors with your photos, this is a good way to store paper. This system works best for a scrapper who picks out a photo and says, “Some orange dots would make that blue bathing suit just pop!”
- Theme: Scrapbookers who create themed layouts find this to be their best solution. This system works best for a scrapper who picks out a photo and says, “I need some wavy paper to go with this swimming theme!”
- Mood: Paper patterns do convey moods. Some scrappers store patterned paper in categories like, “happy,” “subdued,” “energetic,” “playful,” “sophisticated,” “vibrant,” etc.
I think most of us can figure out one category that will work for us, but we get tangled up in the thinking process with papers that don’t fit into that particular category or could be stored in two categories. This isn’t a problem if you sort by brand, but the other options can get confusing. That’s ok. Just because you choose to organize your cardstock and paper by color doesn’t mean you have to be a purist. You can create sub-categories within the organizational system that works best for you.
So which category system do you think will fit your style, budget and preferences? Let’s take a look at how Stacy and I store our cardstock and paper. What we do might help you with your decisions.
How We Organize
How Stacy Stores and Organizes Cardstock and Paper
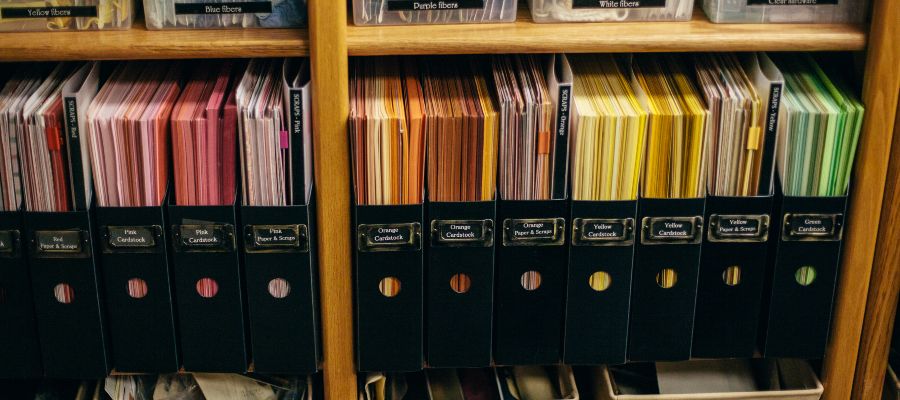
Stacy organizes her cardstock and paper by brand, color and theme, but only puts one color of paper into each paper holder. Patterned paper is sorted by color first (i.e., a red sheet with white polka dots goes in the red patterned-paper holder). If it’s a paper that can go in multiple bins (i.e., a blue paper with large orange dots on it), she files it by theme or pattern. In this case, it would go in her “Dots” file. But if those dots happened to contain flip flops in them, she’d file that sheet in her “Summer” themed file. Get the idea? You can have as many or as few categories as you want. Stacy has about ten themes based on the types of pages she designs.
The one downside she has found with this method is losing coordinating paper lines that have been distributed into her categories. For example, she wanted to make an album of her family’s vacation to San Francisco using the American Crafts “Metropolitan” paper line for the entire album. It took her about three weeks to go through all of her paper bins to find the papers from that line that she’d broken apart into categories. It was a miserable process to have to endure so she reorganized her system--putting her favorite paper lines (American Crafts and BasicGrey) behind a tab in those respective manufacturer bins. Her purple patterned paper is still in the purple patterned paper bin, but if she needs a purple sheet from the BasicGrey “Periphery” line, it’s behind the “Periphery” tab in her BasicGrey bin.
Stacy sorts specialty paper stacks (those that are bound together on one edge in a themed “brick”), and places them in with her colors, themes, or textures. These stacks look neat and organized on retail shelves and online, but when you get them home you generally have no idea how to store them. To get them organized let’s look at two options. You can keep them together in the “brick”, or break them apart and store them with the rest of your paper. If you like to keep stacks together for coordination purposes, and you know what’s in each brick, then you should. You can use a permanent marker to label the spines if you store them vertically. BUT, if you spend more time looking through your stacks than actually scrapping, consider breaking the bricks apart and organizing them with the rest of your paper.
How I Store and Organize Cardstock and Paper
I store and organize my cardstock and patterned papers in Storage Studios Paper Holders. When I planned my room I wanted to have waist-high shelves for cardstock and some paper. Below you’ll see photos of how they look. The Storage Studios containers originally came in black, but now only come translucent. I spray-painted the outside of my new Paper Holders with paint made specifically for plastic.
Because my paper storage is out in the open (not in a cabinet behind doors) and part of the room décor, I want the containers to be neat-looking, unified and organized. I added nameplates to the front of each container and secured them with brads. I added tape over the brad prongs inside the container so they don’t snag paper edges when I remove and add papers. The extra time put into the aesthetics of containers was worth it to me, but you may want the color of your papers showing through the translucent holders. Do whatever works best for you.
 Years ago I purchased 8 x 8 Paper Holders for my smaller papers. I painted them, added nameplates and they hold my 8 x 8 and 6 x 6 papers.
 In 2012, Storage Studios came out with a new-and-improved design for their Paper Holders. They now have finger-sized pull holes on the lower front edges of the bins so they can be pulled on and off of shelves easier. Remember that bins don’t have to be completely stuffed. Leave room for fluctuations that happen with paper coming in and going out of your studio.
During my cardstock and paper sorting I ended up with a large box of paper that was outdated and I knew I’d never use. Oh, the guilt! I’d spent the money, and now was I being wasteful? I finally told my brain to “Stop it!” I loaded the box into my car and drove to a local children’s home. They were THRILLED to receive it for their scrapbook room! Remember, if you’re storing paper you’ll never use, it is taking up space for things you will use.
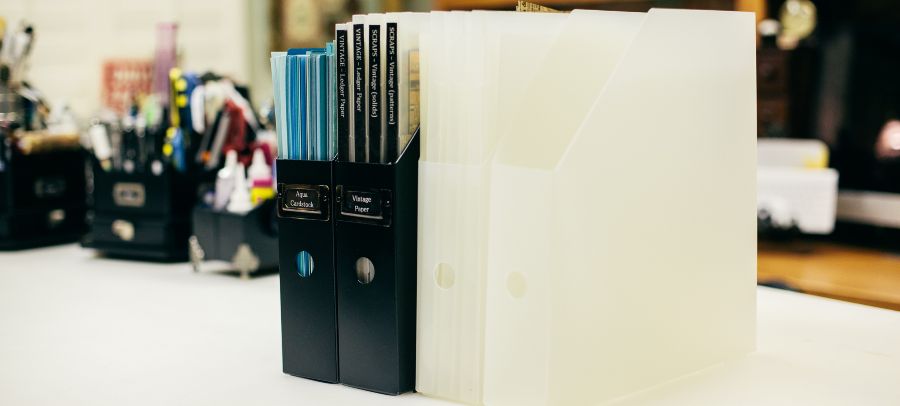
The plastic 12 x 12 dividers are handy and I use them to section-off paper within my containers. As mentioned before, I had one at the bottom of each paper stack when I had Paper Trays.
Tip: Sharpie ink can be used to label some containers in your studio. If you need to change the label name, the ink comes off some plastics with rubbing alcohol or Tea Tree Oil. Make a test mark on the bottom of the container and try to remove it before you make the labeling permanent.
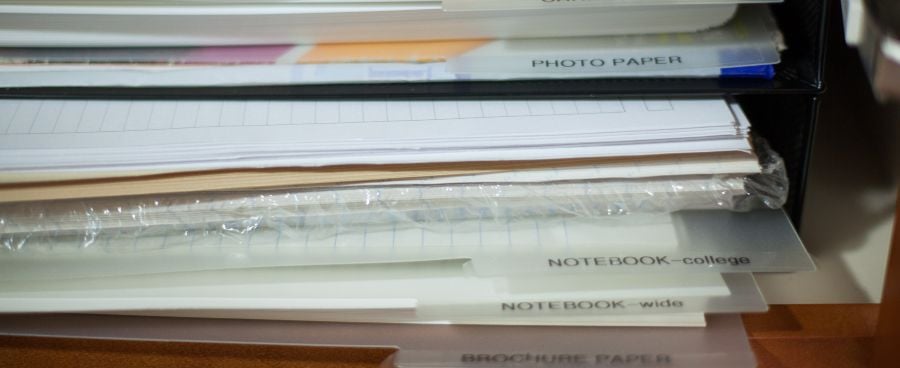
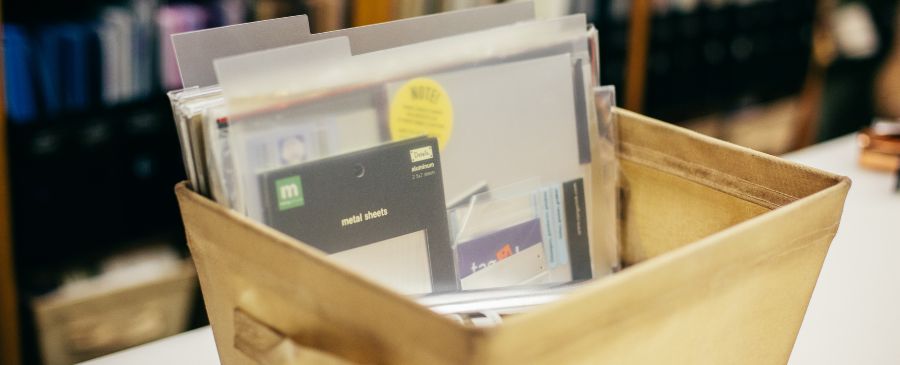
Paper Pouches are a staple in my studio. I label and use them inside my Paper Holders to hold scraps and other supplies. They also store organized paper collections. I also use them to hold all materials for work assignments, in my In/Out center.
Regarding paper sizes, I struggled to make the decision about whether to be an 8.5 x11 or 12 x 12 scrapper. I’ve scrapbooked for decades, and 8.5 x 11 was the only paper size available when I started our family scrapbooks. I was set up and stocked for 8.5 x 11 scrapbooking only. Then, in the late nineties paper companies began to see that if they trimmed their parent sheets of paper to 12 x 12 there was less waste. Yep, we have 12 x 12 paper partially because people wanted to be careful and resourceful.
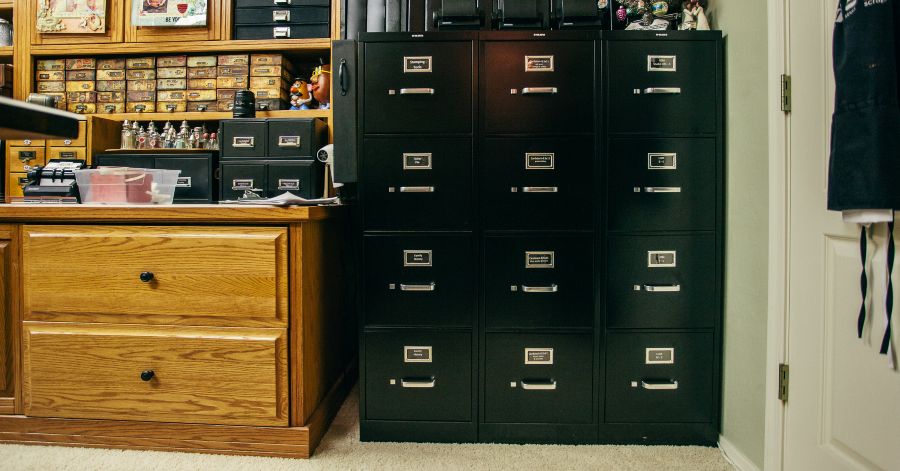
It was a huge investment for me to make the switch to 12 x 12, and I had to learn new ways to design layouts. But I went through the pain, and now it’s DONE. I’ve NEVER regretted that difficult decision or the months of work and effort it took to convert. I still have 8.5 x 11 paper in a filing cabinet in my studio. It too has been culled and is quickly available when I need paper that size. Eventually it will all be gone and I’ll have an empty filing cabinet for family history, memorabilia and treasures.
More About How I Organize Cardstock and Paper
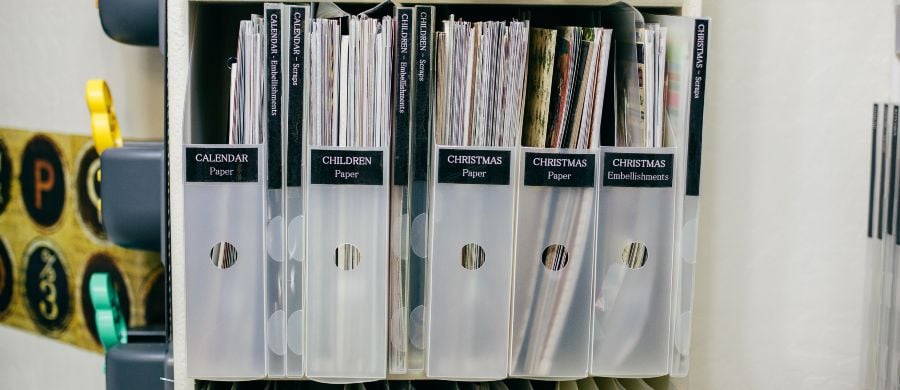
Themes: Printed themed papers are in labeled Paper Holders in my closet. I don’t use them every time I scrapbook, so they take up secondary, not primary, space near my workspace.
Manufacturer Coordinating Lines: I only keep lines together that I absolutely LOVE, and I keep them in their groups in Storage Studios Paper Holders in my closet. If I happen to get a line that’s not a manufacturer favorite, but has some great one-color patterns, I sort them into my cardstock and paper bins by color (see next category).
Color: All cardstock fits into this category and lots of patterned papers do, too. Because I use cardstock every time I work, it is stored in a prime location on shelves next to the island where I stand up to work. It’s stored in ROY G. BIV order in my black Storage Studios Paper Holders. Cardstock is on the left side of the holder and a divider separates it from colored patterned papers. A labeled Paper Pouch is in each Paper Holder, which is for scraps of the same color.
Mood: I sort some patterned papers further, into specialized groups. I’ve included a Bonus Handout this week that explains what can be done since this approach is specialized and isn’t for everyone. Basically, it involves sorting some or all of your patterned paper into groups according to the feeling or mood they convey or evoke. It’s sometimes difficult to “see” the mood in patterns, but if you’re into seeing paper patterns this way, it will seem logical to you. Some scrappers swear by it, and it works with some papers for me.
Storing Extra Page Protectors
I want to briefly mention page protectors because of how they fit into my paper containment system. If you want to do what I do you’ll need to plan for, and purchase these containers now. I’m giving you a “heads up” this week so you’ll plan some space for them on your paper shelves or towers.
I left a space on my cardstock and paper shelves for two Paper Holders that hold page protectors of all sizes. Why are they in with my paper and not where I store extra albums? I have perpetual albums (family albums) that I add layouts to regularly - and after I finish a layout for one of these albums, I grab a page protector, slip the layout inside, and add the protected layout to the appropriate album in our family room. Because I’m usually in the paper area of my studio when I finish a layout, it made sense with the way I think to include Paper Holders for page protectors there.

Summary and Challenge
Challenge:
- Figure out where you want to store your paper - let your available space guide you.
- Make a decision about whether to go vertical or horizontal with your storage.
- Decide on how you’re going to categorize your paper--by brand, theme, color, mood, or a combination.
- Sort and purge. Will you really use pink glittered princess paper when you have five boys? Give it to someone who will and you’ll free up room for grunge papers that make boy photos look so good. Stacy got the biggest table she could find to work on, and put a sticky note labeled with each of her categories in rows, about one foot apart, on that table. She’d then grab a stack of papers and start sorting. If you have a short stack, the sorting could take about an hour. If you have many stacks to sort through, it could take several days. Either way, just keep plugging away. Once you have everything sorted, put it in the appropriate paper holder and label.
- Explore your storage container options and purchase, or make, what you need after you sort and organize the paper you have. You will need to get serious about your paper inventory; you’re going to need enough holders for your current paper and more, because you’re kidding yourself if you think you’ll only use your current supply and never buy another sheet of paper. Once you decide on your storage method, look around for options that suit your style. If you’re into shabby chic and want to use magazine holders, then black plastic holders from Walmart won’t work. Perhaps you can find nice, inexpensive woven-like containers, or you can cover cardboard holders with fabric or paper. Add your personal style to this part of your studio as you plan, work on your containers, and make purchases. Confirm that your storage choices will fit in your space, e.g., don’t buy 40 vertical files when you only have three feet of shelf space.
We would love to see before and after photos of your paper sorting extravaganza! “In-process” photos are welcome and we encourage you to share your experience.
Once you’ve completely organized this area of your studio you’ll begin to see what the rest of your space can become. For me, and I hope for you, organizing really does feel as good as it looks.
Your paper dilemmas will soon be solved. Congratulations!
Tip: Labeling is a visual clue, and visual clues are guides. Objects in an arrangement can be difficult for the brain process when there’s too much clutter “visual noise”, or easy to see and process when the arrangement is orderly. I make labels in my studio easy to look at; the same font, the same color (white letters on a black background), consistent sizes, minimal information (just enough clues). A piece of red ribbon tied to a bin that holds red embellishments (that aren’t visible) will be processed faster than the words on the label.
An orderly guidance system helps the brain have less to think about technically (left-brain), so it can be more creative (right-brain).
Tip: Using white text on a black background maximizes the information processing into long-term memory. Want to be able to quickly and easily remember where your supplies are located in your studio? Use the white on black principle for your labels. They can be made on the computer, or black tape with white text for label makers can be found at office supply stores.
NOTE: This article is part of the beloved free Organization Class at Scrapbook.com. Sign up and take the entire class for free today.
Bonus: Patterned Paper Profiling
Personality profiling has been an interest of mine for over 20 years. I’ve studied with the best from Donna O. Kearny to Carol Tuttle and find their skills and knowledge helpful with everything from how to dress, cut your hair, decorate a home, or organize patterned papers. Because I know the personality profiles of my family members, it’s easy for me to find cardstock and patterned papers that compliment photos of them, so they look natural. One of my granddaughters is regal (Group D) and never looks good in polka dots, so I don’t use dotted paper when scrapping photos of her, only striking and pure chroma color and regal designs.
Noell Hyman at Paperclipping.com shares that patterned papers can be organized and stored by mood (rather than theme, manufacturer or color) so they can easily be matched up with a photo. I personally start with my photo and the colors within when designing a layout, so having my papers sorted into ROY G. BIV works well. However, I do use a modified system similar to Noell’s.
First, all manufacturer collections are kept in their respective collections either under a theme (if obvious) or by manufacturer or brand (BasicGrey is a good example of a pack that’s not always theme oriented but has a “mood”).
Second, patterned papers that are mostly colored and patterned are sorted by color, and then sorted again into five sub groups. These groups A-D aren’t divided because I’m so familiar with them and am able to keep them sorted in one stack. Following are the criteria for my colored patterned paper groups:
Patterned Paper Group A

Color: All colors that begin with pure chroma color and have white added, i.e.” tints”. Note: Cardstock colors in this category will coordinate with Group A patterned papers.
Temperature: Warmish
Pattern: Animated, circles, parts of circles, up and out movement, repetition, busy, buoyant, cute, not structured, princess-like or child-like.
Mood: Extroverted, friendly, bubbly, bouncy, high energy, silly, child-like, cute, cheerful, youthful, fireworks, giggly, lively.
Patterned Paper Group B

Color: All colors that begin with pure chroma color and have gray added i.e. “tones”. Note: Cardstock colors in this category will coordinate with Group B patterned papers.
Temperature: Cool
Pattern: Flowing and elongated “S” curve, curved lines, graceful, flowing, minimal, soft vintage, complex, detailed, classic art, queen-like.
Mood: Soft, mysterious, slow-moving (like a slow moving river), graceful, flowing, minimal, cloudy, whispy, foggy, peaceful, thoughtful.
Patterned Paper Group C

Color: All colors that begin with pure chroma color and have black added i.e. “shades” and earth tones. Note: Cardstock colors in this category will coordinate with Group C patterned papers.
Temperature: Warm
Pattern: Vertical lines forming right angles (angular), geometric patterns, lightning bolts, bold, rough, defined, empress-like.
Mood: Assertive, dynamic, direct, confident, structured, informal, strong, casual, physical, earthy, irregular.
Patterned Paper Group D

Color: All colors that are pure chroma color i.e. “hues” without white, gray or black added. Note: Cardstock colors in this category will coordinate with Group D patterned papers
Temperature: Cool and clear
Pattern: Ovals, fast diagonal lines, parallel lines or columns, regal, crest, goddess-like
Mood: Striking, aloof, efficient, dramatic, polished, regal, sleek, stately, serious, intimidating, sophisticated, clear, accurate
Patterned Paper Group E
This group consists of patterned paper that doesn’t fit into any of the four categories above.


