Livestream Party!
Join us today at 9:00am PT / 12:00pm ET | Details Here.
Join us today at 9:00am PT / 12:00pm ET | Details Here.

 Give a Cheer
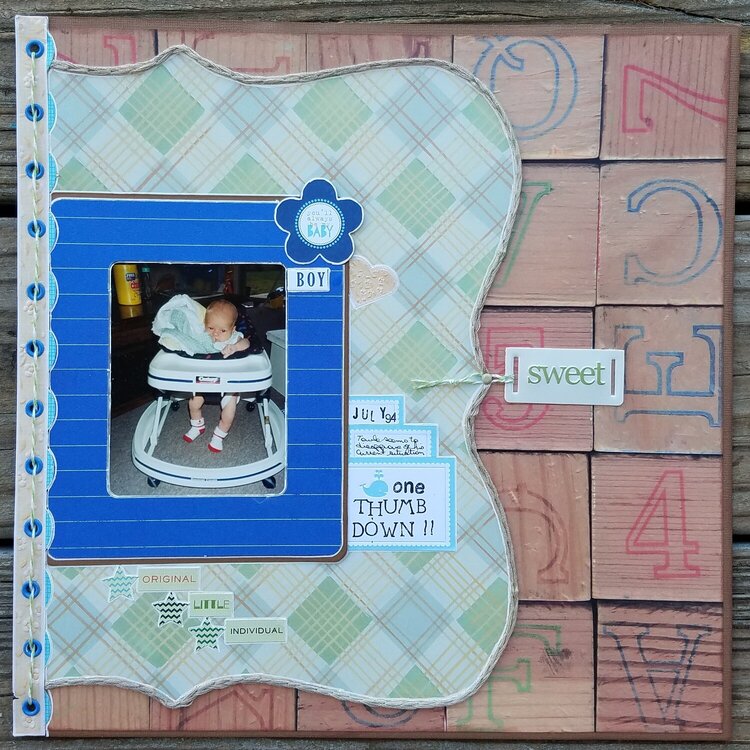
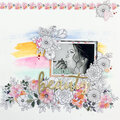
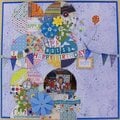
This is my lo for the ROUND ROBIN MAY Challenge. I scraplifted my Selfie Queens By: Kathylovestoscrap, which can be found here:
This is a picture of my son when he was tiny. He's headed to Wisconsin today for his photography job, so it was a "few years" ago.
I tried to stay true to the Kathy's original lo. I matted my background pp as she did. I didn't have a lacy floral cut out like Kathy used, so I decided to use a shaped background piece. I used one I had for a pattern, traced it onto the pp I wanted to use and then cut it a bit smaller to allow the alphabet block background to show...however, it still hid too much of the blocks to tell what they were, so I moved the shaped piece to the side until I liked how the page looked, then I trimmed off the extra edge. I'm not great at handcutting, so I hid my bad scissor work by adding some of the old Sticky Stitches around the edges of the shaped pp.
I framed my photo. I LOVED how Kathy's photo was matted and how it really set off the photo, so added a thin mat to my framed photo. I added little word strips under the picture as Kathy had done. Mine didn't stand out very well, so I added the little sticker stars.
I didn't like the way my lo was looking, because it seemed odd having everything over to the side and just "standing there" kinda lonely looking. So, I added a scalloped sticker edge. Now the colors didn't seem to mesh, so I found another sticker strip that seemed to tie the colors together a little better and added it over the first strip, which just allowed a little of the blue scallops to show. That was better, but now it seemed like I needed more of the blue AND the sticker borders were really old ones that didn't want to adhere very well, so I decided to go to more really old supplies and pulled out the large eyelets and added one to each scallop. Now, they needed a "purpose", so I wove the twine through them.
I really liked how Kathy did her title, but I couldn't find any alphas I had that were the right size and color to work on my lo, so I decided to use a journaling sticker and stamp the title. I had to cut off part of the sticker to make it fit and I still needed some journaling on the page, so I took the scrap of sticker and turned it so it would tuck under the title sticker and added the journaling. I realized I didn't have room for the date, so I took a piece of another journaling sticker and added it and stamped the date on it. I aded the "sweet" tag, just because I found that tag and really wanted to use it and this was the only place I could make it work. LOL
I added the little heart sticker, because I loved the heart on Kathy's lo and I wanted to incorporate flowers as Kathy had done, so I used the little flower sticker. Going with the idea that groups of 3 are always better, I added the little "boy" sticker to that grouping.
I outlined almost everything with a white pen and that seemed to bring everything together much better.
No products have been added to this project.
Thanks for spreading positivity!


June 01, 2017
May 29, 2017
May 25, 2017
May 25, 2017
May 25, 2017
May 24, 2017
May 23, 2017
May 23, 2017
May 22, 2017
May 22, 2017
May 22, 2017
May 22, 2017
May 22, 2017