Storage & Organization up to 60% OFF!
Plus, a FREE Gift! | Details Here.
Plus, a FREE Gift! | Details Here.


Be the first to cheer this project!

 Give a Cheer
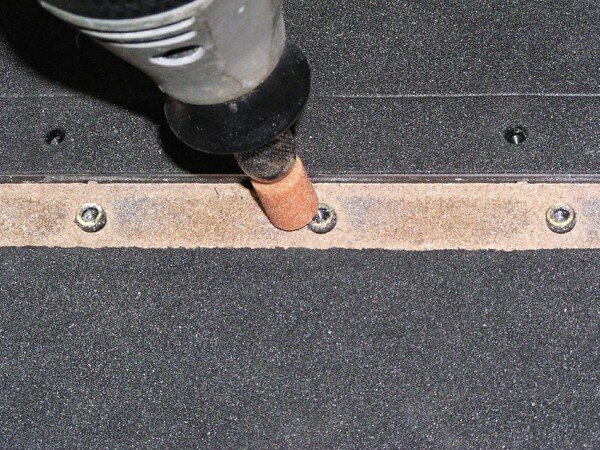
Thanks to Heidi, aka Sweetie Pie Pea, I found out you can do minor alterations on dies! I already knew it was easy to knock out the “holes” in commercial dies but thought it would be a LOT harder on the newer Sizzix dies. This is the Sizzix Bigz Pro Album with tabs. Love the little album but knew when I bought the die, the HOLES had to go. I wanted to use my Bind it All or WireMate so I could bind it with wires or coils rather than use ribbon or rings.It wound up not being quite as hard as I thought! I tried with regular pliers to pull one out, didn't work. After I used my variable speed Dremel and a grinding stone on a couple and then ONE TWISTED while grinding. I decided to see if I could pull that one out. This time, I had the good sense to use my very small locking pliers. It slipped a few times but then the grooves I scratched into it while gripping actually helped the locking pliers get a good grip. I gently twisted it back and forth until it suddenly started coming out of the die. I then went back and finally got a good tight grip on some that I hadn't ground down and was able to very gently twist back and forth. I had to be careful so I didn't damage the straight blade going by it to cut out the little album page. I had to adjust and readjust my locking pliers until I finally got a really good tight grip so that the pliers wouldn't slip up off the “hole”. I only removed the foam over the section I was working on. After removing holes, I replaced the foam and went to the next section. I uploaded the Dremel picture so you could get an idea how I ground it down. *****CAUTION***** put your protective goggles on while cutting the blade!!!! You need plenty of light to see well. I did this on my kitchen cabinet with the under cabinet lights on.With the blades, you could remove the foam on each side and carefully use a grinding bit to grind it down so it no longer cuts OR creases UNLESS you want to make it crease rather than cut! :) You need a VARIABLE speed Dremel and use the slowest speed and proceed carefully. Heidi and I BOTH had no luck pulling out blades on the newer style Sizzix dies, older ones, yes, you can pull them out! ETA: I got so tired of the crease blade on this particular die because I was ALSO cutting holes with the Bind-it-All on what is NORMALLY the SIDE of the album and the creases were really out of place!I got my small locking pliers and just worked it and worked it and finally pulled out the CREASE blade. Now the die is “perfect” for me!For those of you who haven't seen Heidi's blog post showing how to alter the dies, you get tweezers or needle nose pliers to try to grab the END of the foam and peel it off before you start working on the blade or holes. In my case, I only had to peel off a small amount on this die, the part between the cutting blade and the creasing blade was all that needed to be removed. If I'd had a larger surface of foam to remove, I think I would have used a knife and cut the foam smaller. You WILL put the foam back later and it will work just as well in two pieces rather than the original one. I REPEAT *****CAUTION***** put your protective goggles on while cutting the blade!!!! You need a VARIABLE speed Dremel, cut on the SLOWEST speed and BE CAREFUL.
No products have been added to this project.


Thanks for spreading positivity!