Thank YOU! It's Customer Appreciation Week!
EXTRA 11% OFF Orders $100+ With Code: THANKYOU
EXTRA 11% OFF Orders $100+ With Code: THANKYOU


Be the first to cheer this project!

 Give a Cheer
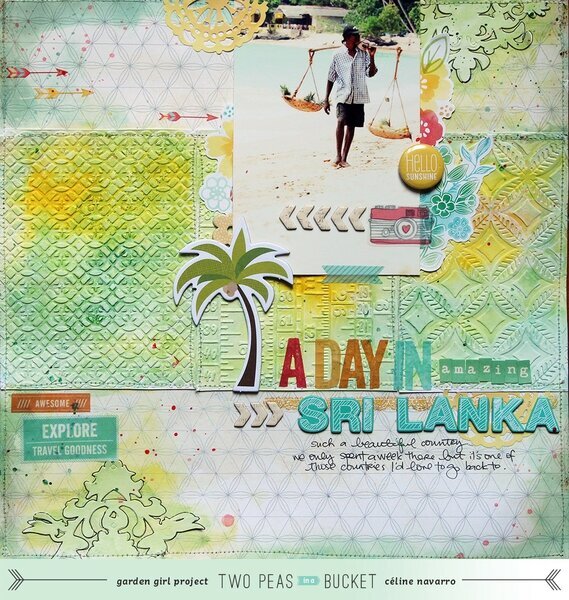
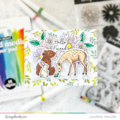
Welcome to the series 213 in 2013!213 in 2013 is a serie of weekly lessons where the Garden Girls and I will provide you with a list of 213 creative prompts by year's end. I'm very proud to introduce you to my second 213 in 2013 video!!! This week I've got 4 fun prompts for you to get you motivated to scrap. You are free to be inspired by all 4 or just pick the one you like best!THIS WEEK'S PROMPTS:1. Emboss Papers with your die-cutting machine2. Use die-cuts as an embellishment on your background3. Add color to your embossed papers4. Outline your die-cuts with a black pencilA little bit about each prompt:1. I've always loved my Big Shot. Back in the days, before 2009, I had no cutting machine. Then, after teaching classes in Singapore, I came back home with a Big Shot, after seeing all the wonderful things girls were doing with it there. And I have no regrets whatsoever. Don't get me wrong : I LOVE my silhouette, so much, but my Big Shot can emboss papers and I love the look it gives my projects, especially hen I had some colors! Even on a monochromatic layout, it looks great! Here, I simply emboss 3 pieces of white cardstock (4x6" each) with 3 different embossing folders from Sizzix, and glued them on my background. They will give a nice texture and depth to my project.2. Die-cuts made with your Big Shot can add a little extra on your background. They will be an embellishment, but also be part of yor background if you add a tiny bit of gesso and color. Simply cut whatever die-cut you may have, glue it with gluestick or tape to your background, apply a very thing layer of gesso on top (this will adhere it even better to your surface) and let it dry.3. Embossed papers look fantastic just as they are. But see how fantastic they look when you add a tiny bit of gesso and mists! Simply add a thin layer of gesso, just to protect the paper from the water you're going to spray afterwards. Let it dry and then spray water and mist some colors here and there. Using a brush, mix the colors together. Add more water if needed.4. If you want your die-cut to really pop out from your background, simply grab your favorite black pencil and outline the edges of the shapes. Be careful though : you need to be sure that the paint is dry, unless you might ruin your pencil.Now enjoy the video of this layout coming together?I'm challenging you to choose at least 1 of these prompts in your layout submission..2 or 3 is even better! At the end of the month we'll draw a winner from all challenge participants for the month and reward them with a $10 2Peas Gift Certificate!
No products have been added to this project.

Thanks for spreading positivity!