


Be the first to cheer this project!

 Give a Cheer
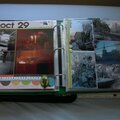
I saw the “christmas keepsake box” by Fabinou in the gallery and flipped! This is my take on the project.1. The house is a square gift box with a lid that sits on top of the box (it was a few years old - one of the decorative cardboard ones form WalMart or Target thatyou can buy in sets around Christmas). I slit the box down one corner and along 2 sides on the bottom using a utility knife and an exacto knife.2. For the roof I used mat board from the craft store and built it around the box lid. I'm not an engineer so I tried making a paper template first - it saved a lot of work! Then I painted it brown. Once dry, I stamped and embossed with white powder. For the snowy patches I took the embossing ink pad directly to the roof and applied powder to the area multiple times to get the right texture. the last step is to add ribbon or trim to the bottom edge.trim: Making Memoriesstamp: Hero Artsembossing powder: Stamp-n Stuff white opaqueembossing ink: Rangerbrown acrylic paint3. For the outside I cut the door and windows from paper scraps, and used a brown stamping marker to add definition.cardstock: Cricuttree die cut: Cricut Joys of the Seasongems: Kaiser Craftpine cone and berry branch stickers: Martha Stewartpatterned paper: K & Co. Christmas Cheerdistress ink: vintage photo (Ranger)brown marker4. Inside the house I used die cuts as places to hold photos. The window and curtains are on the same side of the box inside and outside.patterned paper: see above distress ink: vintage photo, broken china (Ranger)pine cone and berry branch stickers: Martha Stewartfireplace, tree, present, tag and ornament die cuts: Cricut Joys of the Seasongems: Kaiser craftscallop border punch (curtain valance): FiskarsTFL :)
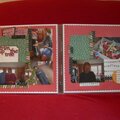
No products have been added to this project.


Thanks for spreading positivity!


