Die Cutting on Sale Now!
Plus, a FREE Gift! | Details Here.
Plus, a FREE Gift! | Details Here.

Be the first to cheer this project!

 Give a Cheer
Bring a background stamp to life with paper piecing, bright colors, and stitched details.
Instructions:
1.To create sky background, apply Tumbled Glass Distress Ink to a piece of Snow Layering Paper with an ink blending tool or sponge. Flick water onto paper and dry with an embossing gun.
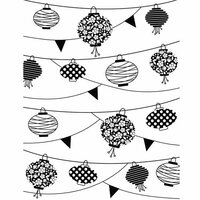
2.Stamp Washi Lantern Background onto sky piece with Splash Chalk Ink.
3.Add stitching as shown, using stamped lines as a guide.
4.Stamp three lanterns onto Snow paper scraps using pink, green and orange inks. Cut out and adhere as shown.
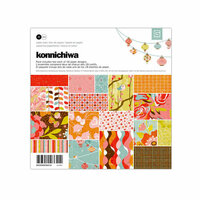
5.Cut green and striped paper strips from Konnichiwa paper pad. Mount strips and stamped lantern piece to brown patterned paper.
6.Pierce two holes above each lantern, thread with white string, and tie bows.
7.Adhere panel to a Snow notecard with foam adhesive.
8.Add two thin strips of patterned paper to card horizontally.
9.Stamp message onto patterned paper strip with Artprint Brown Ink. Mat with Snow paper and adhere to card with foam adhesive.
10.Finish with gemstones.
« Back || HeroArts.com » Cardmaking Home » Card Galleries » BasicGrey » Celebrate!
More Resources
Tip: Use "busy" patterned papers, such as the multi-color stripe here, in small amounts. Use the paper as a guide when selecting ink colors.


Thanks for spreading positivity!