Stamps, Inks, & Stamping Accessories on SALE!
Take 9% OFF orders $100 or more with code: SPRING
Take 9% OFF orders $100 or more with code: SPRING


Be the first to cheer this project!

 Give a Cheer
In January I went to two workshops at Scrapbook Territory in Berkeley, California; the instructor was Lynell Harlow, owner of Dreamweaver. Georgia Sommers was there too--two terrific teachers and wonderful classes. All of my cards are pretty close copies of Lynell's sample cards seen in the fourth scan above.
This workshop was on 1- and 2-step Faux Cloissonè. I love this technique.
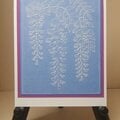
CARD 1 -- Teapot Stencil -- One-Step Cloisonnè
Lynell had already pasted the black teapot (Step 1) so that it would be dry before we began class.
1. Emboss the teapot with black glossy embossing paste on off-white shimmer cardstock.
Remove and clean the stencil. Let the paste dry completely.
2. When the black paste is dry, reposition the clean, dry teapot stencil.
3. Put the bird stencil on top of the teapot stencil. Position it so that the design is where you want it to
be. Tape out the teapot's spout, handle, and lid. Also tape out anything that you don't want to contaminate with paste if it's not already protected by the stencils. We taped out the border frame around the bird stencil. Emboss the bird design with white matte embossing paste. Remove both stencils and clean them. Let the white paste dry.
4. When the white paste is dry, reposition both the teapot and bird stencils. You only need to tape them down in a couple of places. Stencil with pigment inks. Remove the stencils and clean them.
5. Pour UTEE (Ultra Thick Embossing Enamel) over the entire card, lightly tap off the extra, and brush off any powder that adheres to the black teapot. Heat emboss with UTEE.
My Card:
The ink pad I used was a bit dry, and the UTEE didn't adhere very well. My focal image looks more sparkly than like the smooth, shiny surface of cloisonnè. Also, where the bridges were very thin (see the bird's wing), the paste melted together when it was drying on the warmer tray.
I forgot to put the teapot stencil back on when I was pasting the bird image. I got some paste on the shimmery cardstock. When I got home, I used some Adirondack Blending Solution with a paper towel, and almost all of the paste came off without damaging the paper. Cool!
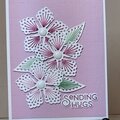
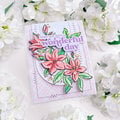
CARD 2 -- Rose Bush -- 2-step Cloissonè
1. Tape down the rose stencil and emboss with Matte Yellow Embossing Paste. Remove and clean the stencil. Let the paste dry completely.
2. Stencil the image with pigment ink. You're going to be coloring again so use lighter colors this first time. Remove and clean the stencil.
3. With your fingers, sprinkle some UTEE over the embossed image and heat emboss. You'll have sparkly dots on the image.
4. Reposition the stencil, and stencil the image again. This time use darker or brighter colors. The sprinkles of UTEE will resist the new ink. Remove and clean the stencil.
5. Cover the entire image with UTEE, and heat emboss it. The image will be very shiny, and the first application of color will show up as specks throughout the image.
My Card: Notice the leaves on the top right side of the Rose Bush card. When the paste was drying on the warming tray, the paste melted together wherever it was close to the next section, and the yellow paste bled out from under the color that I had applied. The warming tray must have been too hot.
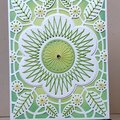
CARD 3 -- Spider Mums -- One-Step Cloisonnè
1. Brush pigment ink onto a piece of white cardstock to create a background for the image. The effect is similar to the effect of using a Tim Holtz ink applicator. Use one to three colors varying the darkness of the color. You can leave it lighter or white in the middle.
2. Tape down the Spider Mum Stencil and emboss with Matte Yellow Embossing Paste. Remove and clean the stencil. Let the paste dry completely.
3. Reposition the clean stencil and stencil the image with pigment ink. Remove and clean the stencil.
4. Use a large dauber to lightly apply Versamark ink over the entire piece. Heat emboss with UTEE (Ultra-Thick Embossing Enamel). Without the Versamark, the stenciled image would still be embossed because you used pigment ink, but the background color is probably too dry to hold onto the UTEE. The end effect is that the focal image is very shiny, and the background has droplets of shine.
TIPS
Use regular matte embossing paste, white or yellow, as when doing the cloisonné technique. Lynell says she uses yellow if she's using a floral design.
Lynell uses Splendor pigment ink which has many colors on one larger ink pad. She used the Circus Color set which has vivid, clear colors. The colors change because of the yellow paste base, so it might be a good idea to experiment.
Lynell uses one brush for yellow, one brush for warm colors, one brush for cool colors.
In the steps, I keep saying to clean the stencil. Actually, unless you need it for the next step, you can just put it in a container of water until you're ready to clean it. You can add Dawn Liquid Dish Detergent or Simple Green if you want to. I do.
TFL.
Daria
No products have been added to this project.


Thanks for spreading positivity!