


Materials Needed To Assess Your Craft Space
Supplies and tools to make a layout and the Space Assessment Handout. That's it!
The Challenge
Design a layout, analyze your space, and complete the Space Assessment Handout.
Our Space Assessment Handout lists the supplies typically found in your craft space with room to make notes about each item and the area where it is located. Our handout is designed to help you evaluate what is in your space and how, where, and when you use it. The assessment will also help you see better ways to use, store and maintain everything within your space.
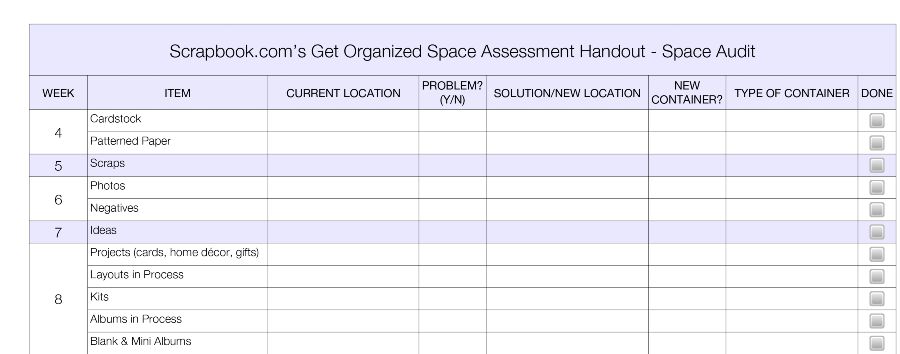
Download and Print Assessment Handout
Designing a layout with the assessment sheet by your side will help you not only focus on your layout, but also help make you aware of your space and how you use everything within it as you work. You'll discover and note previously undetected “hot spots” or “hot messes” that are painfully obvious. Some of you may have such a mess going on that you can't even identify hot spots anymore, let alone find a cleared place to work on your layout. Below I've listed options to get your space cleared right now so you can complete your layout. Note: All options will accomplish the desired outcome - an assessment of your space.
At each step of the layout-designing process, add check marks or notes to your Space Assessment Handout. (click for Excel version) You'll list each supply and tool you use and whether it, or its location, is hindering or helping your creative experience.
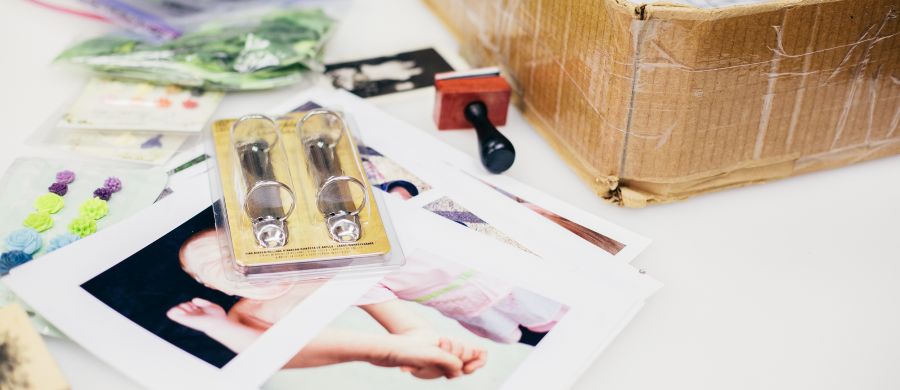
Let's suppose you start your layout with photos. Can you easily locate the photos you want to use? If so, great! Note why it is easy and not a problem on the handout. Alternately, does it take longer than 15 minutes to find those special photos you've been saving for just the right layout? If so, that's obviously a problem area or a hot spot and it needs attention. Write a reminder of that fact, and then move on to note everything else you use--paper/cardstock, tools, journaling, embellishments, ink, etc. You could go through a lot of your supplies and tools in this process and become discouraged. But stick with me. You'll quickly see what causes you stress when you scrapbook and what it is that brings you pleasure. What lies ahead is a better way, I promise.
If you don't use a lot of supplies on your layout or if you have piles of things that need homes, make a quick note, and we'll deal with those things after your layout is completed.
You may feel uncomfortable with this first challenge. There is a reason for the discomfort. Your psyche knows you're not going to be able to stay in the “zone” while making your layout. You're going to get distracted with the assessment process and maybe even disturbed as you have to drift in and out of creativity. Look at it this way, you'll miraculously go from your creative brain during the designing process, and then to your analytical brain during the note taking and pondering. That's quite amazing. Do whatever it takes to help yourself get through this analysis. Reward yourself, if necessary, just don't skip this exercise. It's the key to this entire experience and will be invaluable in helping you get the space of your dreams.
Note: The theme of your layout can be anything you want. However, you might consider designing a “Before and After” layout with pictures of your space in its current condition, and a space left for a victory photo. Remember, keep your Space Assessment Handout next to you as you work and fill it in!
Option #1
My workspace is clean and ready to go. I can start my layout! Lucky you! That's got to feel good.
Option #2
My entire workspace is a disaster, I need to do Plan A or Plan B below. Clean-up can be a quick-fix for relief, or be a little longer for a different result.
It's your choice below.
- Plan A - The Quick Fix - Box it! This plan works for those who have a little bit of organization in place yet feel lost or overwhelmed by a messy workspace. Get enough boxes to hold everything that's currently cluttering your workspace. These boxes will only hold workspace items, not things on the floor, shelves, desk, furniture, etc. You want to get scrapping, so get the stuff on your workspace out of sight. Your favorite tools and adhesives will probably be somewhere in the mess, so place them into a separate “tools” box as you come across them. With your workspace cleared off, you're now ready to create your layout with the “tools” box, and Space Assessment Handout by your side. You'll get back to the boxes and the rest of your room later.
- Plan B - Clean Up! This plan is for those who have some order and organization going on in their space and minimal clutter on their workspace. Dig into the clutter and put every item on your workspace back where it belongs! If your space is semi-organized this shouldn't take too long. The purpose is to get your workspace cleared off so you can make a layout.

DO NOT let yourself get distracted with ANY organizing right now, please. (If you see while working that you'll need a lot of time to put things away or you start getting distracted easily, go to Plan A right away.)
Option #3
I don't want to make a layout—I already know how I work and what my hot spots are.
Okay then. Skip this exercise, but please be conscious of the processes you go through when designing a layout. Fill in your Space Assessment Handout as you think about your space, how it flows, or doesn't. (But I really do hope you'll make a layout.)
Hotspots and More Insight
Hotspots are sections of our spaces where messes frequently or chronically occur. Left unattended or unidentified, they can overtake an entire area, becoming a hot mess. Like an uncontained forest fire, hot spots tend to spread, and the only way to stop a fire in its tracks is with stratagem and skill.
As we all know, the natural response to a forest fire is to run. If you've emotionally left your scrapspace and don't know how to get back in control, you've come to the right place. When you know what and where your hot spots are, and why they happen, you can conquer and control them. I've identified my scrapspace hot spots and attended to them. They are now calm and cool spots that blend with my organizational systems. You can have this, too.
Tip: Every time I reorganize and update items in my studio I find out more and more about my true scrapbooking style. I note tools and papers that I haven't used and those that I have used up. The style shows up, and becomes obvious, in the layouts I create from products I love. As you go through this course, watch and wait for your true style to be discovered underneath the piles of things you do and don't use.
Sometimes, when I have deadlines at work and my time is limited, I don't make the effort to clean up my workspace between projects. I get on a roll and just keep going and going and my studio ends up reflecting my choices. I'm probably no different from many of you; we get into our “flow state,” love being there, productive, and before we know it it's time to quit and we don't have time to clean up. I've learned that clutter is a part of my artistic lifestyle, and learning to deal with it and gain control of it is also part of that life. Clutter, however, can block creative energy and environments and knowing that is often motivation enough to help you keep things orderly.
Spaces can get out of control for lots of reasons: illness, time restraints, great ideas that haven't reached fruition, money issues, space problems, children getting into things, lack of support, etc. So be easy on yourself when it comes to your limitations, but also be honest about what you want, and believe it is possible to achieve with realistic goals.
Tip: If you've had previous organizational systems, but realize while taking this course that they don't work anymore, please let them go and move on to better solutions. Open yourself to new ideas and let them flow into your life. This series is all about organizing but it's also about self-improvement and getting the most you can out of life.
Digression into What It Means to Have a Scrapspace
Bear with me while I bring my perspective to the importance of what we are doing here.
I call my scrapspace a “studio” and think you should consider doing so. By definition a studio is the workroom or atelier [pronounced a-ti-liay—accent on the last syllable] of an artist; as in painter or sculptor. I'm not sure when we get to graduate from having a scraproom, or scrapspace, to having a studio. And, I'm not sure who bestows us that designation, but I think we do it ourselves. Or, maybe it just takes one person, one voice, to help us change our mindset, to encourage us to give ourselves permission to see what we do as something more than a hobby or a craft. If so, consider yourself having received permission.
The work I do with paper is an art form. And, I think this amazing industry is certainly mature enough to support the words “artist” and “studio.” I granted myself permission to call myself an artist of paper and mediums when I was at a small gathering where Martha Stewart spoke. She grappled for the right words to express what she had seen in the displayed layout samples at the convention we were attending. She said she had never seen anything like it, and considered much of what she was seeing as art.
What makes what we do art? Is it the mediums we use? Is it the embellishing, techniques, and principles of style we incorporate into each piece? Yes, it's all of that and more. The more we scrapbook, and look at the work of others, the more we learn what makes a good composition. We learn what contrast can do to a layout, what texture can convey, how balance is achieved, etc. The more we learn, the more that knowledge and skill is reflected in our work, and the more we move from “crafter,” to “artist”.
I do most of my Scrapbook.com work in my studio, and that is also where I work for hours on personal and family memories. The term “studio” gives dignity to what I do. I create in this special place, connect family, and make paper do things it was never intended to do; I sculpt it, and make it sing. And, you do too. You will see me use “studio” often in this series because I love the word, and I want to dignify what we do. Click to download this Studio banner pattern for free.
My studio is the only place in our home where I can get lost in creativity for days, make messes and experiment, and no one questions me. My studio has been in a constant state of flux since I purchased my first tackle box to hold a paper trimmer, scissors and adhesives over 35 years ago. That tackle box, the kitchen table, a stack of 8.5 x 11 cardstock, and a few patterned papers encompassed my “scrapspace.” Life was easier then, and while I progressed with my layout design skills, they were limited because of my rudimentary tool set and sparse supplies.
What we can create in our studios now used to be possible only in factories and studios that contained thousands of dollars of equipment and materials. Think about the albums we can now bind, the dies available for die cutting, the cards we can create, the glitter, inks and paints that weren't available until recently, and then there's technology. I remember receiving a store-bought greeting card and being fascinated by the sparkly medium that accented images on the card front. Those “sparkles” were something similar to Stickles, and we can now have that substance in hand for a nominal fee--and in many different colors.
As I've acquired new tools and products, I've needed to adjust to them and create organizational solutions to fit them into my studio systems. If I'd not addressed each item and given it a place, I'd have hundreds of hot spots, and a huge mess constantly plaguing me. As I worked through this process I found wisdom. And I believe you'll find wisdom in the hundreds of ideas presented in the weekly classes; this wisdom is compiled from the organizational trials, errors and successes of others.
Okay, enough said. Now, to work!
Actual Space Assessments
Let's examine Stacy's and my space assessment. Both of us made a layout, saw the flow of our spaces, and captured the information we needed to understand what we needed to do.
What DID work for Stacy after assessing her space
- Photos – They are easy to select from organized photo binders.
- Layout ideas - Easy to find one that works because ideas are on organized notecards (filed by the number of photos on a layout in Cropper Hopper/Storage Studios boxes).
- Tools – Easy to find because they're in a tool caddy near workspace.
- Embellishments – Are in labeled containers inside labeled drawers and
quick to locate. - Journaling - Pens are in a caddy sorted by type and color.
- Stamps and stamping supplies - Organized by theme in a Rolodex file, stamp pads are organized on a rack.
- Alphabets for titles - Easy to find in an organized-by-color drawer.
What DIDN'T work for Stacy or needed help after assessing her space
- Coordinating paper lines – They're separated from each other (mixed in with patterned papers of like colors) which takes too long to sort through. When papers are not stored in their coordinating paper packs you lose the benefit of matching dye lots and patterns.
- Die cut choices – Restricted. Containers are too small and more space is needed.
- Sticker/rub-on organization – The Paper and Sticker Binders are on a shelf but are a nightmare to navigate.
- Kits – They all fall over if one is removed from their storage place—don't ever want to touch them.
Stacy's conclusions about her space
The obvious solutions for Stacy were to find new containers for problem areas and label them by theme and/or color. She formulated a plan to tackle her problem areas, made lists, and included measurements on the lists.
What DID work for Jill after assessing her space
- Patterned paper and cardstock – They are easy to find and retrieve. My papers are stored and organized by color, theme, or manufacturer which works. Cardstock and some patterned papers are in single-color containers in ROY G. BIV order on shelves which saves time when hunting for the color I need. Note: ROY G. BIV is an acronym for Red, Orange, Yellow, Green, Blue, Indigo (navy blue), and Violet (purple). I also include pink, aqua, brown, black and white in my color separations to make selections even easier.
- Layout ideas – All layout sketches (not pictures of layout ideas) are organized by the number of photos on each sketch. The sketches are glued with removable adhesive onto cards and stored in a repurposed photo stand which makes them easy to use and fun to look through. Idea books are easy to find, peruse, and put away. My Scrapbook.com Account has favorite layouts from the Scrapbook.com Gallery that I've selected for inspiration.
- Tools – Are easy to find and replace in tool carousels on my workspace.
- Embellishments – Are in themed paper holders with their matching collections, or in labeled and color-coded containers.
- All sticker alphas that are on sheets are in color-coded files (in a file drawer). Loose chipboard or 3-D letters are in storage containers sorted by type of letter or number.
- Ink Pads – Are labeled and in a top drawer of the island where I work. Other less-used ink pads and reinkers are labeled and organized in my Stamping/Alpha Center.
- Journaling - Black pens are in a labeled section of a tool carousel on my island. All less-used colored pens and pencils are sorted by type and color in secondary tool holders.
What DIDN'T work for Jill or needed help after assessing her space
- Photos - I need to print out digital photos more frequently and put them in my storage drawers so they're ready when I have time to scrapbook. I have loose photos that need to be sorted, labeled and filed.
- Journaling – I don't like my handwriting some days so I use the computer. I need sticky notes by my workspace to write the measurements of the space where journaling will be on layouts so that I can have this information by my computer (then the layout can stay at my
workspace). I need to organize and de-junk my journaling stamps and keep them in their own container, separate from image stamps. - Stamps and stamping supplies – Find some Rolodex files to hold cards with stamped samples of all alphas and images.
- Embossing supplies - Powders, pads, pens and heat gun need to be contained in the same place. I need a display tray for most-used powders and drawer space for the others. Where can I store my heat gun?
- Vintage embellishments - I have to rummage through several embellishment bins to find what I need. I'd like frequently used items to be in an open container on or near my workspace and the others in bins with specific labels, not just “Vintage Embellishments.”
- Die Cuts - Get my electronic die cutting machine set up and a container for loose chipboard die cut left over from kits I've used.
- Memorabilia - Need a container.
- Sticker/rub-on organization - Why don't I use these more? Let's find out!
- “In” box or “New” box - New product is mixed in with product for work assignments. I need a container to display or hold items I want to pull from my supplies and use when I get an idea for them.
- Computer chair - It doesn't matter that it once worked and was pricey. It doesn't fit the space anymore and hurts my back. Get a new chair.
- Unfinished layouts and projects – They clutter my workspace and countertops.
Jill's conclusions about her space
What works best for me are labeled containers, and colored items organized in ROY G. BIV order. When items are labeled and in alphanumeric order, I function best. The Vertical Paper Holders on waist-high shelves make it easy to see cardstock and single-color patterned papers. Storing themed or manufacturer collections together in labeled containers in my closet is ideal for me. I need four “in boxes” on the wall that are big enough to hold a stack of 12 x 12 items. I want the front to be painted with chalkboard paint so I can change dates and add information about bin contents. They should be labeled “In, Out, To Do #1, and To Do #2.” Big hot spots are layouts in progress and unfinished projects that need a containment system.
Summary
Both Stacy and I worked on and conquered the unruly areas we've shared this week. We made plans for how to fix the problems and followed through with them. We both promised ourselves that we would not purchase storage containers until we had cleared our spaces and knew EXACTLY what we had, and what we needed. You can do this too, and you may find that it's even fun!
Have a great week scrapping and assessing. You'll learn tons of things about your space and how you scrap best. If comfortable, post your findings in our Get Organized forum. We'll see you next week when we'll do some dreaming, and begin brainstorming about each area of your studio!
NOTE: This article is part of the beloved free Organization Class at Scrapbook.com. Sign up and take the entire class for free today.