Shop the Christmas in July Stamping Sale!
Take 10% OFF Orders $100 or More With Code: HOLLY
Take 10% OFF Orders $100 or More With Code: HOLLY


$99.00 $93.95


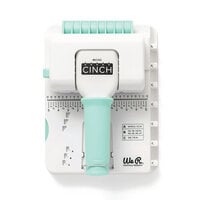
Like its predecessor, the We R Makers Cinch Version 2 is incredibly versatile. It offers customizable punching that permits you to punch perfect round holes without measuring, allows your projects to lay flat while you punch for ease of use, and punches any length of project with ease.
So how does the Cinch Bindery Tool version 2 improve on the original? The Cinch Version 2 has loads of new and improved features:
· New and more accurate cinching bar system
· Expanded compression range - compress bindings from .325 to 1.25 inches, without need for an adjustment bar accessory
· New easy-to-turn knob at top of cinch bar for selecting wire diameter
· Improved cinch platform with filled-in columns ensuring more circular wires
· Improved inner gear ratio for fully retractable punching every time
· Stronger springs inside for easier punching
· Expanded instructions in four languages
· Trendy new color scheme
You will have hours of fun using the Cinch tool for scrapbooking, or creating your own bound family recipe books, journals, albums or daily planners. Bind envelopes, pocket cards, memorabilia, decorative paper, page protectors, die cuts – and anything else you can think of – with the Cinch book bindery tool to create custom mini albums for your special memories. Or print your own pages and bind them with the Cinch to increase your productivity with a custom planner!
This tool makes it so easy to secure the binding wire and hold the book in place while the punch bar presses the binding wires shut. Cut through chipboard and up to 20 sheets of copy paper easily!
Whether you are a beginner or advanced paper crafter, the Cinch tool is easy to use. The instructions are printed right on the machine for easy reference! When you’re done creating, tuck your Cinch Bindery Tool away using the convenient storage clasp.
And there’s no need to worry about your craft space being covered with confetti from all of those little hole punches. They are all captured in a drawer underneath the Cinch tool, for fast and easy clean-up and disposal.
Love the Cinch Bindery Tool V2 but want a color with a bit more modern “pop”? Don’t miss the Heidi Swapp edition of the machine, with identical features and a fashionable black and white striped design theme.
Included in the package is one Cinch Bindery Tool V2 and instructions. The tool measures approximately 11 1/2" x 8" x 5".
Package Contents: Cinch Bindery Tool Version 2, Instructions.
Accessories (sold separately): Cinch Wire Clippers
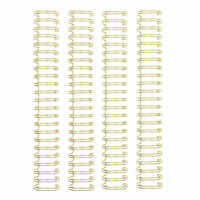
Supplies (sold separately): 1.25 inch White Wires, 1 inch Black Wires, 1 inch White Wires, .75 inch Black Wires, .75 inch White Wires, .75 inch Rosey Wires, .75 inch Silver Wires, 5/8 inch Black Wires, 5/8 inch Silver Wires, 1 inch White Spiral Binding, 1 inch Bark Spiral Binding, 8,5 x 11 Designer Book Board, 8 x 8 Designer Book Board, 6 x 6 Designer Book Board
Instructions: Before using your Cinch for the first time, punch scrap paper with all of the punch holes to remove residual oil left on the machine from the manufacturing process. When the scrap paper comes out clean after punching, your machine is ready to begin your project.
Tip: Always test your Cinch tool set-up on a scrap piece of paper before punching your actual material that you intend to use in your project.
To punch a material less than 6” in width, place the material against the guide in its original position. Following the chart on the machine, pull out the peg for any punch holes to be disabled. Pull the handle down again to punch.
To punch material that is more than 6” wide, start by placing the material against the guide in its original position. Pull down the handle to punch. Then extend the guide all of the way out. Place your paper so that the second hole from the right is on the Cinch tool’s alignment peg. Follow the guidelines on the machine for your paper’s width to select the correct peg to pull out to disable unneeded punch holes. Pull down on the handle to punch.
Tip: Do not try to cut through more than the thickness of 20 sheets of copy paper at a time!
To bind your project, follow the chart on the machine to determine how many coils you need and trim your wire binding to size using Cinch Wire Clippers. Hook the coil to the convenient rack on the side of the Cinch bindery tool and start adding your pages. Start with the back page (not the cover) and build towards the cover. After the cover, add the back cover, with the outside facing down towards the front cover.
Turn the dial on the top of the machine to select the size of bindery coil that you are using. Then place open area of the coil against the back edge of the Cinch tool, and lower the handle firmly to seal the coil. (Repeat if necessary for larger projects.) Flip the book’s covers around into place, and your bound book is complete!
For more instructions, tips and tricks, and ideas on using the We R Makers Cinch 2 tool, view our video below, read/ask questions or browse the ratings and Cinch Bindery Tool reviews below too.

Please read to the end of my review for a Pro Tip.
I had my eyes on this for a year or two, and there was an AWESOME sale on this so I got one. Totally worth it. I'm a journal and notebook (and pen) freak. No matter what though, I could never find "that one". That one that had the *perfect* paper, with the *perfect* journal cover.
After some serious searching I found my dream paper, and The Cinch will punch about 5 pieces of Strathmore 300 series (320 Smooth Bristol in white) at a time.
Pro Tip:
If you're doing a cover, and want to layer paper onto it, punch each separately. If you're adding certain amounts of thickness to your project all at once, be prepared for it not to fit. I did this once. I designed a beautiful cover with one layer of the Cinch Bookboard, one layer of thin chipboard, and a medium weight cardstock and since I had already glued down everything it would not fit. I was heartbroken.
Used in this project: Maya Road Tab Mini Album

Received the cinch about 2 weeks ago and really enjoy this product. Yes, it is simple to use to make journals and other book type crafts, but at first you need to get rid of the oil that is on the inside of the machine. You just keep puching scrap paper for awhile (all 12 pegs) until you don't see anymore oil. It sounds like a long drawn out procedure, but it's not. After that, you're good to go. Always practice with leftover paper before you punch the real thing. Once you get the hang of lining up the holes it's easy. I'm making a 6x6 , 8x8 journal right now and it's really fun. It's like making a smash journal, you can add whatever you want to it to personalize for yourself or for gifts. I'm going to make a few for Christmas gifts this year. Everyone likes a journal. Try this product, it's fun and creative !!! If you do get stuck and need advice about using this, go to you tube. The videos will help you if you need it. Thanks :) Have fun with it !!!

After reading a million reviews on both, I chose the cinch because it can accommodate a longer item. You can also adjust the holes and it is very easy. I don't think the claim that squares are stronger than holes is valid. I had no problem getting the wires round and I like having the directions right in front of me on the base of the Cinch.

May grandsons love making their own books. My 3rd grader is currently making a dinosaur book. He alternates lined paper with drawing paper. He writes the information about each dinosaur then either draws or pastes a picture on the next page.
When all done they can punch the holes and put the binders on by themselves.
One of these days I will get a chance to use it. I want to make a special album for each of my children.
So, I have to admit, I was a little skeptical to purchase this product, it was a little on the pricey side...... BUT... I'm so glad I did. I have literally used this machine every single day since I got it. Very easy to figure out how to use,
I was using it within 5 min. The machine is one of the most quality products
I highly recommend purchasing! You'll be hooked on using it. I make lots of mini albums, and this is perfect because I can choose how many holes I need according to my project. Run.....go order yours!!!!!! lol
I really love this machine. I chose the circle, even though I liked the Heide Swap Black and White design, especially since my room are in those colours. Although the square is nice - it still reminds me of cerlox binding. Also - the circle version allows for more binding wire flexibility. The only reason I gave a 4 star instead of 5, is because it's hard to get the wires. I can get them in bulk and/or in two's and nothing in between - plus a bit expensive for Canadian's. Overall though - I like the system and you can play around with the design of the binding. I would love to see a tool to un-cinch and cinch again - but that it is. I would recommend if you want a nice binding system

I always struggled with measurements for my Bind it All. I find the Cinch WAY easier to use. And I love the round hole punches too!
Used in this project: She Loves School
The Cinch is just that - a cinch to use. It's very sturdy and extremely well made. If you don't have one, you need to get one! This tool gets more than a five star rating from me. It should actually be put in the Book of Awesome :-)

My Cinch is one of the most heavily used items in my craft room. I am constantly making scrapbooks or notebooks and the ease of using this machine makes it my favorite! Instructions are listed n the device so you can make items right out the box!
This binder was awesome and helped me quickly assemble smash books for the Christmas season! I do wish it could punch thicker materials but over all a great tool if you're into binding!!
You must be signed in to comment. Please click here to sign in.