


This article was written by Scrapbook.com founder and organizational expert Jill Davis. It also uses some methods and concepts developed by organizing guru Stacy Boatman. With Stacy's permission and help, we've included her concepts and experiences in this guide as well. You can also take the full, free class with multiples lessons and detailed photos. And if you need them, you can get craft storage products here at Scrapbook.com to help.
Materials Needed to Organize Your Space
- Boxes or bags to hold items you sort in your scrap space
- Notebook or art journal for jotting down notes and thoughts
- Positive thoughts
The Dejunking and Organization Challenge
It's time to develop a system for dejunking and organizing your craft space! Make the choice between "Challenge #1" or "Challenge #2" and make a commitment. (BONUS: Set up a Design File.)
Before I begin, I want you to know that you're about to make a BIG decision. This a decision only YOU can make. You're going to decide whether you want to tweak just a few things that don't work in your space, or if you're going to completely rethink your space, fixing every organizational system within. You will then work on relocating every possession into your newly organized systems and space.
Challenge #1
If your space isn't a mess but could use work in a few areas or needs finishing touches, here is your challenge: Choose to address one problem area and start working on it immediately! I highly recommend you fill out the Space Assessment Handout, which will help in pointing out your problem areas. Choose the area that shows up first on your handout, or the one that bugs you most. For example, let's say you haven't found a good way to organize your stamps yet. Get all your stamps together and put them into a large box or paper bag. Remove that container from your space. You can revisit it later. Once you are finished, tackle the next problem area by accessing the information in this course that will help you. You'll keep working on the things that show up on your Space Assessment Handout until you are satisfied and finished.
Challenge #2
If your space is a huge mess, this is your challenge: Go all out! You'll need LOTS of boxes, because you're going to box up everything in each of your problem areas (or your entire space), label those boxes and take them out of your space. Keep specific items for specific jobs together, e.g. all stamps and ink pads in one box, punches in another, dies in another, etc. If you dump anything and everything randomly into boxes, it could take a week or more to go through each of them when you want to locate items for an area you're focused on. Not good or fun, so keep like items together as you box and/or bag.
Boxes will not be allowed back into your space until the organizational system for those particular items is in place. This means the system is functional, accessible, and reliable: There are working and labeled containers and it's neat and organized. This means you might be without your supplies until you get your organizational act together--which may be exactly what you need.
Dejunking Your Space and Simplifying
Which challenge should you choose, #1 or #2? Only YOU know what you can handle based on your dejunking and organizing capabilities. I suggest challenge #2 if you want to completely reorganize your space and are the type of person who can complete a project no matter how long it takes. Challenge #2 also requires you be the type of person who doesn't get easily discouraged or sidetracked. If all of this sounds like you, then GO FOR IT!
HOWEVER, if you aren't sure you have the time, money, and interest to keep up with challenge #2, and you get bored with long-range projects easily and lose interest, then I suggest you do challenge #1. You can always box up more problem areas later if you change your mind.
Stacy has seen some spaces in need of TLC in her teaching; scrap spaces that were a catch-all for diapers, out-grown clothes, boxes of artificial flowers, and even a space where a woman couldn't locate her computer. If this sounds similar to your space, then it's time to suck it up and go for broke. Get LOTS of boxes. Go to major department stores and ask if they'll give you slightly used boxes for free. You're going to not only have boxes for your scrap supplies, but I suggest you also set up five other boxes or containers with the following labels:
- SELL
- ATTIC/BASEMENT/GARAGE
- DONATE
- TRASH/GARBAGE/RECYCLE
- RELOCATE
As you dejunk your space, evaluate every item. Put items that will be organized in your studio into their own labeled boxes, and everything that doesn't belong in your space (or involves scrapbooking) into one of the five boxes above. If an item has a home in another part of your dwelling, put it in the "relocate" box. When that box is full (and only then), take the box from room to room and put the items where they belong. Waiting until boxes are full will save you time and unnecessary trips through your home.
You may end up with several boxes in each of the five categories. That's okay. Stacy boxed up her "Sell" stuff and put it in her garage to tackle where her challenge was over. I filled my "Donate" box(es), and when I had several, I called my favorite charity to pick them up. I was able to spend the time working on my space instead of driving to the donation center myself. I put the contents from the "Attic/Basement/Garage" box(es) in our garage as soon as they were full and labeled. The important thing throughout this packing process is to get the boxes OUT of your space, and not to stack them in another room causing another mess. Spend this week making your room a clean slate and keep the rest of your home clutter-free during the process.
Note: For the record, I chose Challenge #1 and Stacy decided on Challenge #2. I liked the paint color on my walls, my window treatments, furniture, and most of my organizational systems. I couldn't go all out because I work every day from my studio, and I needed to keep systems in place, making changes when I was able. As I worked and made decisions, I used the information I'd noted on my Space Assessment Handout.
Stacy was in a position to go all out with her organization, furnishings, and decor, because she had just moved into a new home. She refused to unpack the boxes from her former studio until she had new organizational systems in place. She tackled one type of supply at a time, following the observations and suggestions on her Space Assessment Handout. She made a plan of how and where to store each group of supplies, tools, equipment, etc., organized and contained them, and THEN and ONLY then, they were brought into her space. Slowly, her empty room filled up with clearly labeled boxes and pretty containers full of supplies and equipment. Everything was exactly where she wanted it to be.
It is easy to organize once you've dejunked and cleaned the slate. With nothing cluttering your space, you are able to see options and possibilities that weren't visible before. A clean slate also allows you to move furniture and possibly even change the location of your space within your home. It took Stacy about four months to get her room up and functional. She has done minor tweaking since, but hasn't needed to do any major overhauls. If she ever does need to do an overhaul again, she says she won't hesitate to box everything up and repeat the process. Despite the overwhelming stack of scrapping boxes in her kid's room, it was definitely easier for her to do Challenge #2 rather than trying to work in a cluttered space where she'd get sidetracked with other projects.
I struggled and was often frustrated with the disorganization in our home during my challenge. Now that it's over and things are back to normal, I think it would have been better if I'd packed up the majority of my studio and worked from a clean slate. I could have done my Scrapbook.com online work from a a laptop, and my creative projects could have been completed at our kitchen table with totes nearby. However, lessons were learned and it was time to move forward.
Special Bonus
I have a special assignment for those of you who chose the BIG challenge, Challenge #2. This is the time to get your foundation established and functioning. Your space will be empty, so there is no better time to paint the walls, change out the flooring, or put up a new light fixture you've had your eye on. At the very least, vacuum, clean the carpet, dust and wash the windows, etc. It's easier to do these things when the room isn't occupied.
Also, if you have your space cleared, you can consider relocating or switching spaces. If you have a spare room and have thought about utilizing it as a studio, this is the time to make that happen. If you're in a corner, a closet, or the dining room and there's space somewhere else, make the change now. Maybe you've considered moving out of the basement and into the spare room, or moving out of the linen closet to a dining room armoire. You already have your things packed up. Why not make the change now? Additionally, if you give this process plenty of time, you will have sorted out placement of furniture and crafting supplies before you bring everything back in to the craft space.
Choose your challenge and start collecting boxes. Clear out your space or problem areas right away. I think you'll feel better immediately; I know I did. Also, please consider posting pictures in our Gallery and comments in our Forums. By doing so, other community members can learn from your experiences!
Insights About the Decluttering Process
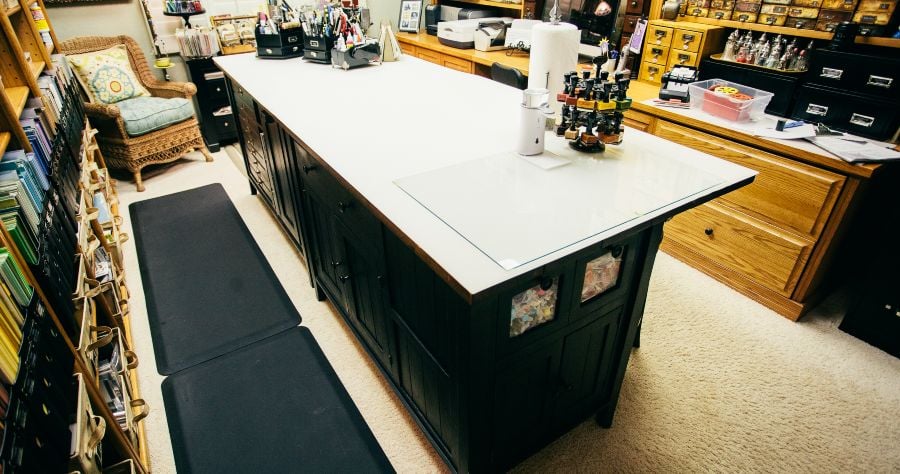
As I mentioned, I chose Challenge #1, which took almost six months to complete. Yep! There were times I wondered if I was sane. The more I organized and dejunked, the more I found things that needed to be fixed; piles to sort through and containers to label. Have you read the children's book "If You Give a Mouse a Cookie?" It's a great tale about scope and sneak--how you start out with one idea or goal and it grows into many more if you don't stay focused on the original. Well, that's what happened in my space. The more I organized, the more I realized there were areas that could be revamped to work better. So, while the house was in a bit of turmoil (actually, A LOT of turmoil), I opted to address those areas and just get it done. In a way, I went for broke, doing a modified Challenge #2, because I chose to organize and revamp. I worked in my space, only boxing things as I addressed them. The key to my sanity was trying very hard to keep the island in the center of my room clear. On the days it was clean, I breezed through processes and completed projects quickly. The days that it was full of clutter were the WORST, since I had no place to stack and sort. I strongly urge you to use boxes or paper bags to get the clutter out so you can bring it back in an orderly manner.
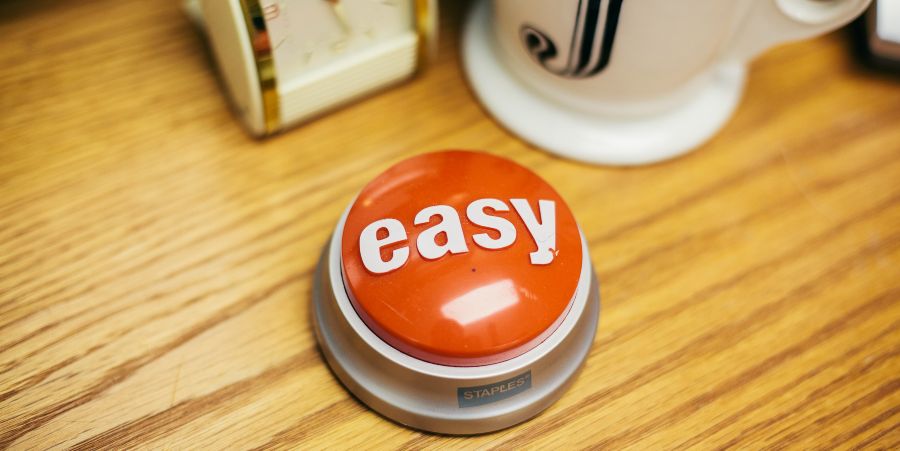
Below are the guidelines I have used when organizing anything in my home. I posted them in the doorway of my space so I could view them as I worked. I also purchased a personal cheerleader, an "EASY" button from Staples. Each time I completed a step of my plan (whether large or small), I walked to my desk, pushed the button and heard the button say,"That was easy (in a funny, comical voice)!" I laughed, felt successful, and amazingly had more energy to keep going. Thrills can come cheap, sometimes, and processes really did seem "easy" with this little boost. You can also establish a reward system where you treat yourself with something small, like candy, every time you complete a step in your plan.
Organizational Guidelines
Flexibility
Be flexible with your system(s) and how you approach organization. There is always a better idea out there, so get a system in place that you think will work. If you happen to find something better later, you can always change it. Systems, supplies, and tools change, as do our needs. What you put in place today may or may not work a year from now. That's okay and is to be expected.
Labeling
Label every container. Labels help us find what we're looking for so we don't have to keep track of so much in our brains. Use a label to maker to save time.
Be True To Yourself
Find systems that work with how you think and work. Then, be consistent with those systems. Study the systems of others; outline your ideal system from what already works and what you'd like to see improved.
Acquire Containers
Purchase containers AFTER you have chosen your organizational system. Consider using lidless bins when possible (they're easy to get in and out of, and there's no bulky lid). Know what you have and what you need. Take measurements of your totes and spaces before you go shopping. Take pictures with your phone and take measurements when you find something but aren't sure if it will work. An American dollar bill can serve as a simple measuring device if you forget a measuring tape--it's about 6" long.
New Products
Put newly purchased items away as soon as you bring them home. Packaging adds bulk to your containers. The exception would be rub-ons or adhesive-backed items that could get damaged.
Simplicity Is Key
Avoid over-organizing and over-thinking. Keep it simple.
Access
Create an accessible system. Everything should be reachable. It should feel natural to reach for the things you use most often. Keep primary tools, supplies, and equipment in primary locations--within arm's reach. Secondary tools should go in secondary locations nearby.
Sorting System
When sorting, break everything into large piles and then into smaller groups. For example: If you have a two foot high stack of paper to sort, break it down into one inch chunks. It is then easier to handle, mentally.
Create Space
Resist the urge to overfill containers. Allow for growth. If you run out of space, purge and get a new container or put a moratorium on spending until you use some of what you have.
Use What You Have
Upcycle or repurpose. Containers can be pricey. If your organizing budget is limited, consider asking for gift cards or cash for your birthday or special occasion. Have fun looking for what you need at thrift shops and garage sales, or in your very own garage, attic, or basement. Check out Etsy or Pinterest for ideas on how to upcycle or repurpose every day or vintage items into storage solutions. Paint, paper, fabric, or minor woodworking can transform something ordinary into something extraordinary, making it useful again. Organizing and repurposing is another form of creative expression.
Back-Up Stash
Have a container back-up stash. Keep one or two jumbo storage boxes in the garage/attic/basement where you place extra or outgrown storage containers. I've been pleasantly surprised to open up one of my boxes and find the perfect containers for a new system. Then, before you go shopping for any new containers, check your stash first. You may already have what you need.
The Aesthetics of Your Decluttered Space
The aesthetics of your space is very important as well. My studio has a vintage vibe, so I knew I needed to keep an eye out for special pieces to complement the look and feel of my space. From the day I accepted Challenge #1, I knew I wanted to work on how I needed my space to look. On my Space Assessment Handout, I noted that room decor was one of my areas of improvement. I immediately set up a system for finding cool pieces. I found some shops on Etsy that carried vintage items and supplies that helped me with my storage and decoration needs.
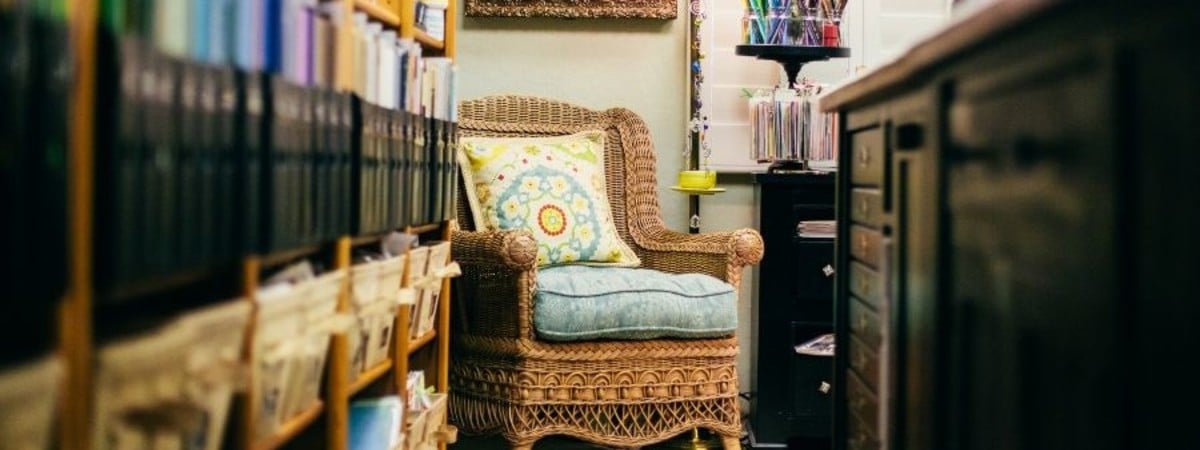
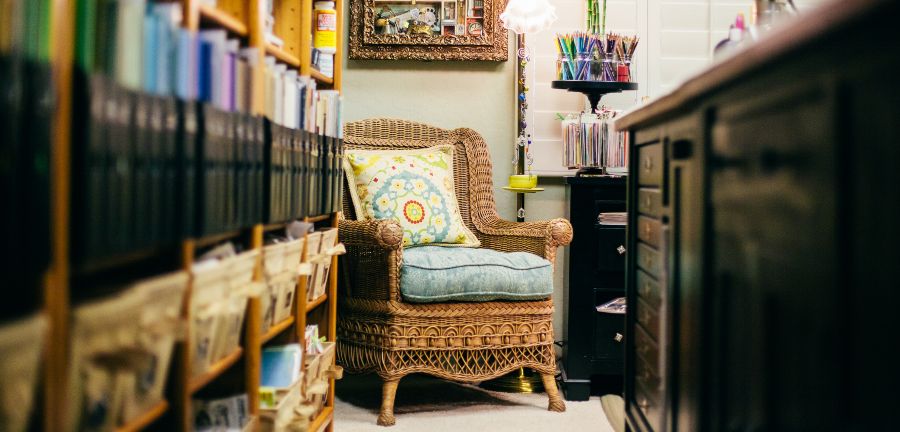
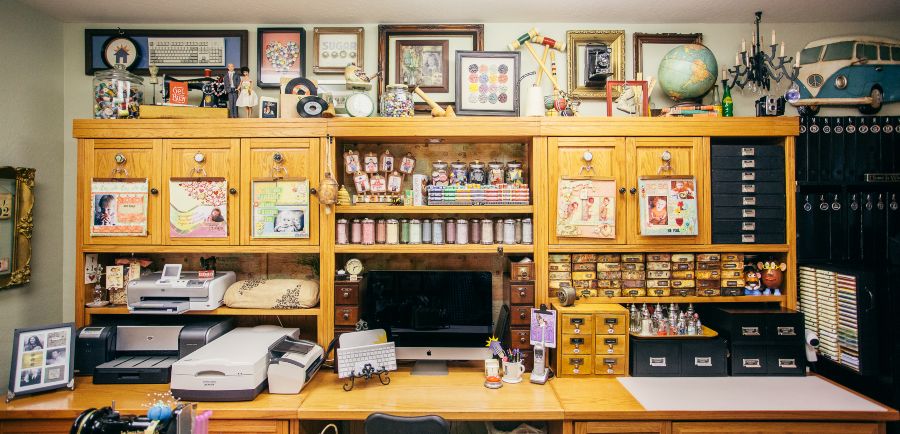
I found my first island piece on Craigslist (the second piece I had custom made to match it). The first piece was fire engine red, so I brought it home, hauled it to the backyard, checked it thoroughly for insects, then painted it black. The wicker chair in the corner of my studio was found at a thrift shop, and my monster wall unit desk came from a consignment shop. I LOVE repurposing, so I checked places that had lightly used pieces first. However, I'm very careful about what I purchase and where it comes from. The last thing you want is a bug or mold problem.
Design Ideas for Your Craft Room or Workspace
Let's cover some of the basics of room design and space planning. If you have a blank slate to work with and don't know where to start, create a design file. Now, before you flip out or quit reading, understand that this will take some time to finish. In fact, it may never be finished, but that's okay. A design file is simply a guide, a collection of things you find while looking for ideas. It took Stacy months to plan her space, with most of the planning done while sitting on the couch in the evenings watching TV. I started mine when I started the challenge and continued to gather ideas until I was satisfied with my studio. I still have my files and use them for other projects or to spark ideas in other areas of our home. If you don't know where to begin when designing your space, this is a great place to start! Look at it this way... If you were going to remodel or reorganize your kitchen, you'd make lists and gather ideas in a file folder, or in a folder on your computer. Your studio is just another space, but with a lot less silverware. A design file is simply a place to store your ideas and plans.
Both Stacy and I know the value of a design file. Ours contained anything and everything we truly desired in our spaces. You can start now by looking on the web for pictures of spaces, styles, and storage options that look and feel amazing to you. Stacy saved every picture of things she liked on her computer, and when Walgreens had a photo sale, she printed them. She filed them in a 3-ring binder by topic and photos of workstations she admired. Paint colors went into a "Room Design" section. Pictures of neat ribbon storage ideas went into a "Ribbons" section. You get the idea. You can save a little money and keep your file in a digital format, or go all out with a physical copy. The choice is up to you.
Don't limit yourself to only scrapping spaces. Any color combination, non-scrapping furniture that may work, etc... All should go into your file. If your home is a black hole for inspiration, check out store websites and consider visiting their physical locations too! Don't be afraid to take a few pictures so you remember what you like. Don't look at the price tags... Instead, try to look at the possibilities and discover what inspires you.
Getting your design file filled with scrapbook-related ideas and inspiration may be tricky. Head into the Scrapbook.com's Gallery, where you will find LOTS of ideas for inspiration. Good print sources for ideas include interior design magazines such as Elle Decor, Traditional Home, Real Simple, House & Garden, Interior Design, and Architectural Digest. These are all great for ideas. There are also a few scrapbook organization books out there that have room ideas. Don't forget to try your local library. Free is good!
Focus on Function, Plan and Form
Your space design should emphasize the following:
- Function
- Plan
- Form
Function
Firstly, your space needs to function. This means it needs to fit YOUR style and the way you scrapbook. A standing island is useless if you prefer to sit when scrapping. Consider how you want to work in your space.
Plan
You're going to hear me mention this A LOT in this challenge. Anything you incorporate into your space needs to be thought out in advance and have a purpose (or many purposes). PLANNING is the key to this project. Where will your main scrap area be? What tools need to be close by (primary tools)? Which tools can be stored further away (secondary tools)? Do you have kids? Sharp tools might need to be out of reach, maybe in closed storage with child-safety locks. How about centers: One for stamping, one for die cutting equipment, etc? These centers can be in mobile totes if you have a small space to work with. Keep these things in mind when planning.
Once you have an idea of how your tools and supplies will be stored, you will need to develop a room plan. Measure your space with a tape measure, noting door and window locations (obviously, you can't put a bookshelf behind a swinging door, but you CAN put a short one under a window). Then, transfer these measurements to grid paper. Create a scale that is easy for you to understand (i.e. Maybe one grid block on the grid paper equals one foot of room space.). When you have your room designed, it's time to decide the placement of the furniture. Measure the furniture you intend to use in your space (or if buying, find the dimensions online). Draw them in the small scale on a separate piece of grid paper. Cut these pieces out, and you now have paper dolls to move around on your room diagram. You can do this if you are installing cabinets and you can find the dimensions online. Measure the bulky furniture to ensure that it fits through the doors and hallways. This is an inexpensive and easy way to plan a space.
Allow for movement. Usually 30" to 36" for aisles is good, and 36" to 40" behind desk chairs to permit someone to scoot back from a desk. Remember to leave space for cabinet doors to open or drawers to pull out. Finally, note lighting issues and outlets so that while you are planning you will know where a computer, heat gun, glue gun, or lights can be placed. Outlets can be tricky. If at all possible, you want to avoid having to drag an extension cord across your space for your sewing machine or tools. If you do, cover cords with a cord cover. Set up your centers to fit your space plan.
If you have a very small space to work with, maximize your area by going vertical. In Stacy's old house, she had a small corner in which she put a computer hutch into. She then stacked four Sterilite drawers on top of the hutch. She had to use a step stool to get to the top drawers, but she had her secondary tools and supplies there, so it worked. She had five boxes across for a total of twenty drawer units. Not bad for a small space. Closets are great for concealed shelves. Take out the hanging rod and you can go floor to ceiling with shelving.
Consider that all of your stuff doesn't have to be in one space. If you have a small armoire unit in the dining room, you can use that; you can have a storage box under the bed in another room, or a mobile card or two in a closet. Older photos, reference materials, and completed albums can be stored elsewhere. Go on a house hunt and see what unused space you have. You might surprise yourself! Make note of these little hidden gems on your space plan so you will remember them.
Form
Your studio will be your creative haven. It needs to be uplifting, inspiring, and a wonderful place you'll be comfortable spending time in. Don't stick yourself in the damp, moldy basement just to have a large room. If you want or need to be near the family, a corner armoire can function in the family room. Find a space that has great natural light coming in throughout the day and adequate light at night. Consider using full spectrum light bulbs to achieve "natural" lighting. As you gather pictures for your Design File you will see a trend in the colors you've pulled. Maybe it's blues, greens, or black and white. These colors may be what you want the pallet of your space to be. Treat your space like you would a layout. Choose your main colors and then have some accents (like embellishments) that will make the room POP!
Furniture is trickier. First, decide on the space you have, and then look at what you have that could fit into the space. You might need to get a few new pieces, or get all new furniture. If you have a dream for your space but your budget doesn't match, focus on the most important pieces and save up or look on Craigslist, garage sales, or consignment shops for the rest. Let your friends and family know what you are looking for and let those interested get involved. You could get an unexpected phone call or text from a family member or friend who has spotted something they think you're looking for.
If you do have the budget and are considering specialty pieces or built-ins, know what you're going to have to store and where you'll put it before making final decisions. Stacy had her supplies mapped out down to which drawer her paints were going into, before she bought a single cabinet. What's the point of having a custom space if you have to tailor your stuff to fit into it? Design really is basic. Figure out your methods or systems of organization; the supplies that will be in the systems. Then, find stylish furniture and containers that fit your space, supplies, and overall taste/style. If you have general ideas for what you want to do, that's wonderful! If not, hang in there. The key is to find a place, a system, and furniture that will make you happy and want to stay put for a while so you don't have to go through this challenge again anytime soon.
Without committing to a Design File, you've probably already considered a binder or file to keep all of your ideas in. Also, you've probably considered different options for your space. See how much progress you've made already? Now, it's time to combine and finalize your decisions.
More Organizational Insight
I'd like to mention centers again. They are areas within a space that contain ALL supplies and tools needed to perform specific tasks or techniques. Centers make it possible for you to stay in one place to work, without having to go from place to place to gather what you need for tasks. For example, I have a stamping center in my studio that consists of stamps, ink pads, stamping tools, embossing supplies, and Rolodex files with stamped samples of all of my stamps. Each of these items are used for layouts, albums, and cards and are readily accessible when it's time to stamp.
There is a feeling of order in my studio. It has form (reflects my personal taste and style), and function (is organized and has a work flow). Form and function are both very important to me, so I worked hard on my planning during my brainstorming session to define what I wanted and needed in order to have a functional, inspiring, and beautiful space.
If you look closely at your Space Assessment Handout, you'll see that items are grouped into areas. These areas can have similar tasks performed in them and have the supplies and tools needed to perform those tasks; they're the beginning of a "center." When grouped together, they can maximize efficiency.
Summary
Sometimes things must get worse before they get better, and it takes thought and effort (sometimes EXTRA effort) to get the challenge we choose accomplished. This could be true of your new and improved studio. However, it is possible and will be worth it. Good feelings are on the way!
If you are looking for further information on creating and organizing your craft space, check out these two informative articles here and here.
Want to share your craft space with others so you can inspire them? Post your images into the Scrapbook.com Gallery, and don't forget to tag #LifeHandmade and #Scrapbookcom!
This article is part of our free class called Get Organized. To further expand on your craft space organizational skills, sign up and take the class for free here!


