
$8.49
$50.99 $47.99
$139.59
$100.00
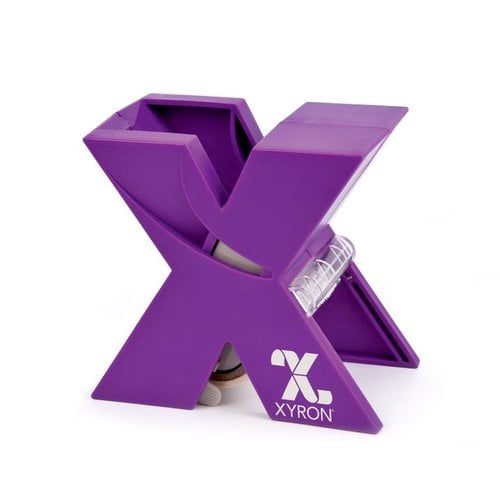
Create your own stickers with the Model 150 "X" Dispenser by Xyron Create-A-Sticker. Create permanent or repositionable stickers that are up to 1.5" wide! This dispenser is perfect for mini photos, die-cut letters, small embellishments and more.
This is an affordable must-have for any scrapper! I originally purchased it to use with smaller letters, embellies, etc. cut from my cricut. After dealing with the nightmare of liquid glue and glue pens getting EVERYWHERE, I decided there had to be a better way - and there was! I absolutely love this little gem of a machine. It's incredibly easy to use and for under $10 you can't beat what it can do. You just drop it in the top and pull it out the other side. I've found that using any of the tools that come with your rub-on packs around the edges takes care of any extra adhesive.
Before I purchased this little guy, I thought about getting one of the larger ones, but I figured I'd only be using it when I used my Cricut so I didn't want to spend the extra money. But it turns out that this is the perfect size, anything too big to put in the X is big enough to use with a different adhesive. It turns out I use this for all kinds of things, not just for the Cricut. If you put chipboard letters through, face down, it'll apply adhesive to the top and then you can sprinkle it with glitter, flocking, or whatever you like. You can also do this to get adhesive on both sides by running it through once, peeling off the top, turning it right-side-down, and running it through again. I also run my ribbons through it and, voila, self-adhesive ribbon. It really opens up a lot of creative possibilities. Thanks Xyron, for creating such a great product at an affordable price!
Used in this project: 2
This is one of the most frequently used tools in my scrapbooking tote. It's inexpensive, light, easy to use, and the roll of adhesive lasts forever. I bought the xyron 510 model because I liked the idea of interchangeable cartridges, but I use this one at least 10 times more frequently. Why pay a lot more money to get adhesive backed cardstock for your diecuts when you can easily just run the diecuts through your xyron after you're done cutting?
A couple of tips: use a bone folder or similar object and rub the adhesive film before removing it to make your sticker come off the backing paper easier. Also, if you get some extra adhesive on the page, xyron makes an adhesive eraser - or you can use any gum araser from an art supply store.
I use my Create-A-Sticker for things that are difficult to add adhesive to or if I want something to be completely flat. I run tiny cut-outs through it, ribbon, raffia bows, and my special signature logo.
Each of my cards has my very own signature logo on the back. I make the logo on my computer, cut it out with my 1" circle punch, then run about 20 at a time through my Create-A-Sticker. After rubbing the back with my EK Success Rub-on Tool to make sure they are all stuck tight, I pull the clear front off and leave them in a small roll in my embellishment box. They are ready whenever I need them. I just pull the logo off and attach it to the back of my card. If there is a little sticky left on the edge, I use my EK Success Adhesive Remover to rub it off. The logo is perfectly flat and will stay that way.
Used in this project: dots Noel
This is definitely one of my best purchases. When I first started scrapping, I bought a lot of tools that I now think - Why? This one is different. It is great and I use it frequently. The size is perfect for small die cuts. I use my die cut machine to cut out small alpha letters but they are too small to attach with regular adhesive. But, slip them through this easy to use product and voila, they attach easily. The tape adhesive seems to last forever! My only caveat is that you should make sure you rub the plastic top layer several times before you attempt to peel the backing - this helps to ensure you have a good bond between the adhesive and whatever you want to stick. And boy does it stick! Enjoy!
Used in this project: Sun & Sand File Folders
I can't imagine scrapbooking without my Xyron 150. I finally started using cut titles last year after purchasing a Quickutz Squeeze tool…the Xyron 150 makes adhering those tiny letters and numbers a breeze…just drop the letters into the chute, pull the adhesive out the other end and voila, a sticker! No more sticky fingers messing with glues and small pieces of paper, no cleanup of glue leaking out from under die cuts. And not only is this good for titles but for any smaller pieces of paper or narrow strips. I did a page recently that used several small journaling blocks/strips along with paper borders…I just used this to make stickers out of all of them and presto, gluing down those pieces was a snap. I love my little X!
Used in this project: Greg's Graduation-Left Side (SHCG Cardstock Challenge)
My Zyron "X" goes with me everywhere. It's lightweight and small enough to take along anytime I'm away from home doing papercrafting. I love to use it for ribbon embellishments because I can simply run it through my X and the adhere it to my project without getting smears of adhesive or having to fuss with putting down dots.
I do try to maximize the adhesive roll by doing all the items I know I'll be putting adhesive on all at once so I don't waste the 1" of tab at the beginning of each application and I will also run 2 pieces of ribbon through side by side if they fit to get the most out of the width.
This is a fun and easy way to make a sticker out of any small shape and I would think it would make anyone who papercrafts happy to have it by their side!
This is one of those products that I can't live without. I use it for adhering my letters and small die cuts from my cricut machine. It is very easy to use and the refills are also easy to change.
All you have to do to create a sticker, is place your letters or die cuts in the opening, face up, and then pull the tape from the other side. Tear off the tape and then, using a bone folder, popsicle stick, or something hard, rub around your letters firmly. Carefully peel the clear covering off the top of the letters, and then stick your letters to your layout! If you have some extra adhesive around your letters, you can use an adhesive eraser or art gum eraser to remove it.
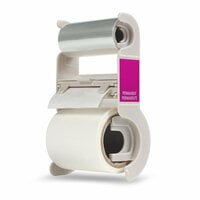
The refills just snap in and out of the X. Very easy!
The X will take items up to 1.5 inches. It is perfect for patterned paper, card stock, and very thin chipboard.
When my mother introduced me to the Quickutz Dies, I had no idea how to get those teeny little pieces of paper to adhere to my projects. Then, I met my Xyron 150. I love this product! I was skeptical as to how many items I could run through the adhesive runner before I had to replace it. Was I surprised. So much more than I would have imagined. This product is well worth the money. It is one item I couldn't scrap without.
Used in this project: Altered Steno Pad/Journal
I bought this little gem and some refills. I've used it twice and am very happy with the results. The second time I remembered some tips I saw in a video and it was very easy after that to make perfect stickers. I did about a dozen little stickers at the same time and you really do save on the tape. So glad I got it. Easy to use and so handy to have. Who would have thought I could make my own stickers at home!!
After years of use, my old Xryon X Dispenser went haywire. I thought I could get along without one. I was wrong. It makes adhering small die cuts much easier and with no mess. I just bought some word dies and this dispenser is ideal for attaching them smoothly to cards and scrapbook pages.
You must be signed in to comment. Please click here to sign in.

